Showing posts with label OPI. Show all posts

Tuesday, 15 October 2013

The Digit-al Dozen Does Skittles: Neon, Nude and Studded

Press Sample Purchased by Me

Good Morning friends!

This week is yet another Digit-al Dozen Week here on Sincerely Stephanie and we are welcoming some new members this week! This week is also very exciting because I chose the theme this week, and it is my absolute favourite kind of nail art, SKITTLES!! If you are looking for more information as to just what skittles are you can check out my post on The Digit-al Dozen blog here.

My post is a day late starting as yesterday was a holiday here in Canada and I was finishing up spending time with my family and boyfriend whom I won't see again for over a month, so please excuse the late start!


For this manicure I started off with OPI My Vampire is Buff on all my nails except my index nail. I then grabbed my favourite small cut down nail art brush and some gold studs from Born Pretty Store and started skittling. Yup I just made that a verb.


The gold glitter on my index nail is OPI Liquid Sand Honey Ryder and all the neon line work was done with China Glaze Sun of a Peach. The neon looks really washed out here, but it was soooo bright in person and the contrast was fantastic. I think my favourite nail is the gold cross, what do you think?


I can't wait to see what everyone else is coming up with! Hope you are all having a lovely start to your week :)


Monday, 30 September 2013

31DC2013: Day 30 Inspired by a Tutorial

Press Sample Purchased by Me

Morning friends!

Here we are in the last day in September! I can't believe we are here already! This month has seriously absolutely flown by. Today's prompt is inspired by a tutorial. There are a ton of tutorials out there for some awesome nail art. I stumbled upon this super cute Piglet tutorial by Qt Place and knew I had to do it!


Isn't this adorable?! I absolutely loved the Winnie the Pooh series when I was growing up and Piglet always stuck out to me because he was so cute and had a stutter somewhat like I did growing up. So Piglet always resonated with me.


I won't get into details about how to do this manicure because you can go check out the tutorial here! The light pink is OPI I Theodora You and the dark pink is Nicole by OPI Something About Spring. All the purple outlines are China Glaze Gothic Lolita.


What do you think of my Piglet nails?! Would you wear these?

Make sure to head over to The Lacquerologist to see what tutorial inspired Emily today! Also enter our giveaway!!
See last years tutorial inspired nails here!

Friday, 27 September 2013

31DC2013: Day 27 Inspired by Art

Press Sample Purchased by Me

Morning friends!

Today's post is Day 27 in the 31 day challenge! I am soooo excited and proud that we are nearing the end! We've almost finished another year! So awesome! I am really excited about today's nails because I have been wanting to do this design since June! One of my really good friends Ashley O'Brien is an amazing artist. She paints beautifully and I got the pleasure of seeing this design in person, so when I was thinking about what to do for today's nails I finally had the excuse to do these nails!


She created this beautiful piece for her cousin's wedding so this is now in Ireland. I love the rough purple gradient and the paisley pattern. The whole thing is really amazing! For my nail interpretation I started out with my go to Cult Nails Tempest on all my nails to have a nice blank canvas to try to replicate Ashley's beautiful work!


The whole manicure was done with my smallest cut down nail art brush and a bunch of polishes! I pretty much just kept looking at the picture of her painting and painting on my own nails and adjusting until I was happy with it. Here are all the polishes used! If you're wondering about a specific one just ask below!
Pure Ice Jail Bait
LAQA & CO. Nookie
Pure Ice No Means No
OPI Miss You-Niverse (review coming soon)
OPI I'm Feeling Sashy (review coming soon)
China Glaze Gothic Lolita
China Glaze Fancy Pants
China Glaze Snap My Dragon
Born Pretty Store Sweet Color #009
Essie Good As Gold


It's a little hard to see in the picture, but on the right hand side of the painting in the purple gradient there were awesome purple rhinestones! So On my pinky and thumb I added a line of purple rhinestones to emulate that! I even tried to get her signature on my pinky! :D


I'm so happy I finally got around to doing these! That you Ashley for the amazing inspiration! What are your thoughts on these nails?!

Make sure you head over to The Lacquerologist to see what art inspired Emily today! Also be sure to enter our giveaway!!
Check out last years inspired by art nails here!

Friday, 20 September 2013

31DC2013: Day 20 Watermarble

Press Sample Purchased by Me

Good Morning!

Today brings us to the most dreaded day of the challenge, the water marble. I hate this technique. I have never posted any on this blog that I have not been forced into because of a challenge. Don't get me wrong! I have tried, again and again and watched countless videos on how to properly draw a design and I fail. Every. Single Time. I went into this with high hopes! But yet again I cannot draw a design no matter how many times I try!


For this water marble I started off with OPI Skull and Glossbones an off white gray. Then I proceeded to marble with China Glaze Gothic Lolita, China Glaze Passion For Petals as well as Skull and Glossbones. I went about it the usual way, by dropping dots into a shot glass filled with water and then drawing my design in. One nail at a time.


Well I did it. I'm not sure if I like it, I always get frustrated and associate that feeling with watermarbles. At least I didn't cry this time! There have been many times where I have attempted and after hours just stopped lol. SO what are your thoughts on this water marble?! Do you like it?

Make sure you check out Emily's water marble over at The Lacquerologist!
Check out last years water marble here!

Monday, 16 September 2013

31DC2013: Day 16 Tribal

Press Sample Purchased by Me

Good Morning!

Today's challenge is Tribal, I really enjoy doing tribal nails, and have done a number of different tribal designs in the past, but I have never looked up any specific tribal art and recreated that! It has always been just a random application of colours and patterns. When I was in Alaska last month I learned a lot about the Tlingit Natives, pronounced Klinget, one of the groups of native people that still call Southeast Alaska home. At the stop of Icy Strait Point, Hoonah, Alaska we discovered much of the history of the Tlingit Natives and got to experience much of the art and totem poles that exist there. I took a number of pictures of the carvings that were on the walls and I decided to recreate one of those works today!


Here is the picture I took of the carving I recreated! The lighting isn't the best, but you get the idea. In person these were so beautiful.


For this manicure I started off with a white base using Cult Nails Tempest just to have a good surface for creating the art on. Then I drew the outlines of the fish and the wings with Wet n Wild Black Creme. Then I began to fill in the coloured areas using Born Pretty Store Sweet Color #009, the teal, Cult Nails Evil Queen, the red, and a mix of Cult Nails Feel Me Up and Joe Fresh Caramel for the yellow. All the details were done with my smallest cut down nail art brush and a small dotting tool.


I went back in with OPI A-Piers To Be Tan and filled in all the remaining white areas to mimic the wood of the carvings. I really loved the final outcome of these!


I created this combination image in case any of you want to pin my tribal manicure! I had a lot of fun in Alaska and learned a great deal about the Tlingit People. If you would like to learn more, you can check out some of the facts on this Wikipedia page!

Be sure to check out The Lacquerologist to see Emily's tribal manicure today! She has been killing this challenge so make sure you're checking out her posts!
Check out last years tribal manicure here!

Saturday, 14 September 2013

31DC2013: Day 14 Flowers

Press Sample Purchased by Me

Good Morning friends!

Today brings us to the 14th day of the challenge, and I think I have one of my favourite manicures yet to share with you! The prompt today is Flowers and I have known exactly what I wanted to do for this day ever since Emily and I decided we were going to redo the challenge! I was at my Grandma's house for a BBQ earlier this summer and she had the most fabulous floral napkins out, at the end of the night I asked her if I could take one and she said yes! So I have been keeping the napkin close by to recreate for this day. I'll show a picture of the napkin later in this post.


For these nails I started off with OPI My Vampire Is Buff my go to nude polish. Then I went at it with my smallest cut down nail art brush to create the flowers and leaves! All the polishes I used will be listed below. Since this was a fairly complex design I won't get into specific details about how I did it other than I looked at the napkin and then tried my best to scale the pattern down to fit on my nails!


The polishes used for these are are as follows,
Cult Nails Evil Queen
Billie Zinfandel
China Glaze Def Defying
OPI Congeniality is My Middle Name
OPI A-Piers To Be Tan
Joe Fresh Caramel
I did a variety of mixing these polishes in different combinations to get the exact shade I wanted! Here is a picture of my nails with the napkin!


I seriously love these and never ever want to take them off! I think it is up there with some of the best freehand work that I've done and I'm super proud :) What do you think of my floral nails?!

Be sure to head over to The Lacquerologist to see what Emily has come up with for Flowers! Also be sure to enter our giveaway!!
Check out last years Flowers nails here!

Friday, 13 September 2013

31DC2013: Day 13 Animal Print

Press Sample Purchased by Me

Good Morning loves!

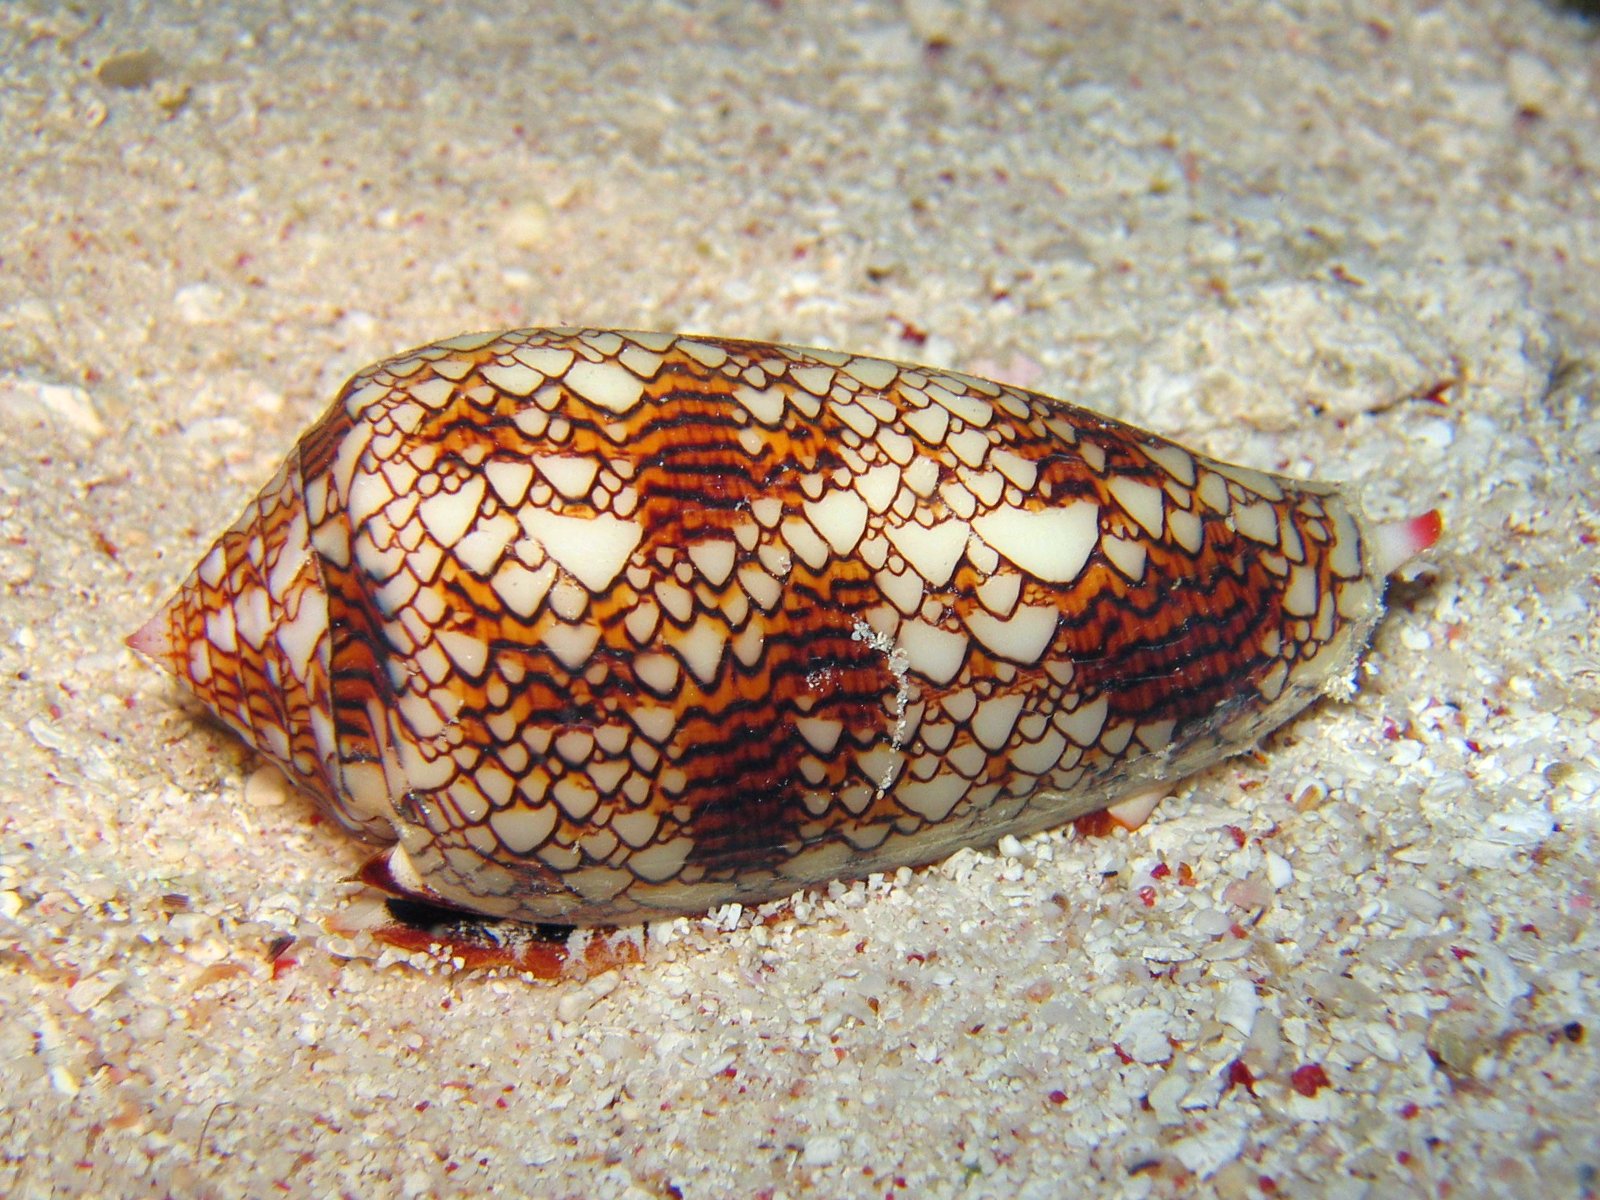
Today brings us to day 13 in the 31 Day Challenge with today's prompt being Animal Print! I just did an animal themed manicure for the Digit-al Dozen September Spectacular, so I did a bit if researching to find something interesting to do for today's prompt. I found myself on National Geographic's website looking at Dangerous and Deadly Sea Creatures! There are so many amazing animals out there but I decided to go with the dangerous theme once I saw the Textile Cone Snail.


Here is the snail if you're wondering how close I got to it's print!


The textile cone snail looks innocent, but is actually one of the planet's most toxic creatures. They "harpoon" their prey with hollow teeth, through which they inject a lethal venom. Their most common victims are mollusks, though they have been known to eat their own kind!!


These nails were pretty simple to do! I started off with OPI My Vampire is Buff and then mixed OPI A-Piers To Be Tan with acetone on wax paper to thin it out. Then I applied the thin mixture in random splotches on my nails. Then I used Revlon Hot For Chocolate and my small cut down nail art brush to create the lines over the brown patches and the V's over the rest of the nails. When I was topcoating instead of floating the topcoat over my nails, I dragged it a little over the brown patches to get the same effect as the snail!


I created the above image for easy pinning so people can see that this actually is an animal print!! What do you think of these animal print nails? Do you like the snail print?

Be sure to head over to The Lacquerologist to see what Emily has done for Animal Print! Also be sure to enter our giveaway!
Check out last years animal print nails here!

Thursday, 12 September 2013

31DC2013: Day 12 Stripes

Purchased by Me

Good Morning friends!

So full disclosure before we get to today's nails. When I was painting these I completely thought that the prompt for today was lines instead of stripes.So my manicure is a little more linear than stripey, but it still kind of fits in with the theme! Right?!


I actually really love these! I started out with OPI My Vampire Is Buff on my thumb, index and ring nails, Color Club Metamorphosis on my middle nail and Orly Luxe on my pinky. Then I went to work with my smallest cut down nail art brush and Wet n Wild Black Creme and just drew lines changing directions every so often until my whole nail was covered!


On my middle nail I did a gradient with Metamorphosis and Color Club Sky High and then created the small triangles with Luxe and outlined them with black creme. On my pinky I tried to do the opposite and created the triangles with Metamorphosis and Sky High and then outlined them in black.


I really liked wearing these nails! I'm also quite proud of my fine line work here :) What do you think of these nails?! Do they fit the stripe theme?

Be sure to check out The Lacquerologist to see what Emily has come up with today! Also be sure to enter our giveaway!
Check out last years striped nails here!

LinkWithin

Related Posts Plugin for WordPress, Blogger...