Showing posts with label guest post. Show all posts

Monday, 19 August 2013

Guest Post Megan of Will Paint Nails For Food

Good Morning friends and Happy Monday!

I hope you are all having a great start to your week today. We are still doing guest posts here on Sincerely Stephanie as I take a little more time to recharge before school starts in a few weeks! Today's guest poster is Megan of Will Paint Nails for Food. If you aren't already following Megan you need to start now! She is a fabulous nail artist and has gorgeous nail beds! Let's let Megan take is away!

*******************************************************************

Hi everyone! My name is Meghan and I blog at Will Paint Nails for Food. I’m very excited to be doing this guest post while Stephanie is on her much needed vacation. I’ve been following her blog for some time now and admiring her nail art, so I was extremely flattered when she asked me to do this.

Guest blog posts can be a tad stressful, and I went back and forth several times over what to do for this post. However, last week I received an order of polishes from Harlow & Co. including Femme Fatale Cloudburst, a polish that has been on my wish list for quite some time now. And luckily it didn’t disappoint.


Cloudburst has a sheer mint base with a golden shimmer, and a gorgeous mixture of neon pink, fuchsia, white, black and holographic gold glitter. I knew right away that I wanted to create some abstract patterns to go with the polish.


To get this look: I started with two coats of Pure Ice Home Run (pale mint crème) on all nails except the accent nail for which I used piCture pOlish Metallic Mush (pale gold metallic foil) as my base polish. On my pinky, index and thumb I used two coats of Cloudburst. I had to fuss a bit with the glitter but otherwise the application was great.


The abstract designs were done carefully with a detail nail art brush. I used Misa BreakAway (dark purple shimmer) and Metallic Mush for the design on my middle finger, and BreakAway, Sally Hansen Back to the Fuchsia (fuchsia shimmer), and Sally Hansen White On for my ring finger.


Other than some minor smearing when I applied my top coat (yikes!), I’m pretty happy with this design. I really wanted the abstract designs to complement the Femme Fatale polish.


What do you think of this design? Have you ever done nail art that is inspired by a polish?

************************************************************************

This is fabulous! I love being inspired by a polish and Megan knocked it out of the park with this one! Make sure you head on over to Will Paint Nails For Food to follow this fabulous girl! Thanks so much again Megan for being here today!

Sunday, 18 August 2013

Guest Post Sam of Polished Art

Morning friends!

Today's guest poster is the lovely Sam from Polished Art. Sam posts some great nail art so let's let her take it away!

************************************************************************************

Hello everyone!

I am SO excited to be doing a guest post for Stephanie today! I absolutely love this blog – her nails are complete perfection. So when she replied to my email and said she’d love me to do a guest post for her, I will admit I had a bit of a girly screaming moment...

So anyhoo, I ummed and ahhed for aaages about what to do for this post. I finally settled on an Aboriginal art inspired manicure. Well, that was a complete disaster (cue mini meltdown), so this is what I’m showing you instead! A little while ago I was lucky enough to win a giveaway hosted by the lovely Rebecca over at Polish Etc . The prize was a polish of my choice from Pretty Serious. I hadn’t heard of the brand before this, so I looked through some of Rebecca’s swatches, and oh my giddy aunt! So many pretties! I eventually settled on this lovely:


This is Liquid Leprechaun – a gorgeous green glitter, with some gold hexes thrown in for good measure. I used two coats over Barry M Spring Green, although actually I don’t think you need undies with it.

Naturally, I had to add a leprechaun!


I used the DIY decal technique that’s been around on a few blogs recently, where you paint topcoat on to a poly pocket, do your design on there, and then top coat again and peel it off. I extra cheated though by tracing this little fella (you wouldn’t like to see my freehand attempts at drawing faces!). Although I traced him off my computer screen, and my computer BSOD’d mid-leprechaun...not ideal.

I hope you’ve all enjoyed my post, and thank you again to Stephanie for this amazing opportunity! I hope she’s having a lovely time relaxing after finishing her degree :)

*********************************************************************************************

Aww how cute is that leprechaun! It looks perfect against Liquid Leprechaun! Thanks so much to Sam for being here today for me! I hope you are all having a great day!

Saturday, 17 August 2013

Guest Post Jessie of Nailed it NZ

Morning friends!

Even though I am back from my vacation now, I am continuing on with guest posts for the next little while. By the end of my thesis I was feeling a little burnt out so I'm using this opportunity to take a break from blogging and let some more awesome people take over my blog! I had a serious outpouring of people willing to guest post for me so I figured why not!

One of those fabulous ladies is Jessie from Nailed it NZ! Jessie actually won my nail art contest back in February, she is a very talented lady! Let's let her take it away!

*********************************************************************************

Hi everyone! Just a quick intro - I’m Jessie from Nailed it NZ, and Stephanie has very kindly let me guest post today. I’ve been nail-blogging for just over a year and YouTubing for the last few months, and nail art is a huge part of who I am now!

I must admit I haven’t done a guest post in ages, and had forgotten how much more self-conscious I am about putting my nails on someone else’s blog, rather than my own! After a bit of tossing up ideas and internal debate, I decided to do a then-and-now post (One Nail to Rule Them All has heaps of these!).

Here are my old tribal nails – my first attempt, thirteen months ago.


And here are my new ones! I had to change some of the colours, as I had gotten rid of some of my old $2 shop nail polish that I used in my first one. Other than that I tried to keep the pattern as similar as possible.


Looking at the two pictures, the main differences are;
< - The lighting and photography
- Cuticle clean up & care
- Thinner/more quality polish (first one looks very thick)

The actual technique involved wasn’t much different, which is interesting. What a difference a good photo and clean-up can make! Although looking at them, my hands look a bit too white. It’s the middle of winter here in New Zealand, and if I have my nails exposed for an hour while painting them I find my hands go an attractive zombie-like colour :P.


The nail polishes I used for this design were:
OPI – A Roll in the Hague
OPI – Suzy Loves Cowboys
China Glaze – White on White
Kleancolor – Catch Me


I have a confession, regarding these nails – I only did them on one hand and I took them off straight after taking photos! Normally I’d have the same design on both hands and wear them for a few days, but I really wanted to get my birthday nails done (it’s my birthday tomorrow, at the time of writing this) so off they came. That’s the beauty of photos though, and it means that I’m never too precious about my designs. As long as I’ve got a photo of it, I’m okay if they come off a bit early. It is a bit disappointing if they chip off early when I hadn’t planned it though.

Anyone got any recommendations for a top coat that doesn’t chip or peel easily, and doesn’t get gluggy half way through the bottle?


Well that’s it from me, thanks for reading and a big thanks to Stephanie for letting me guest post today! I love your blog and there are so many designs on here that I have on my “to-recreate” list!

*********************************************************************************

These are so cute! I do love tribal nails and it is always fun to go back and look at how you have improved over time. A big thanks to Jessie for being here today! Hope you are all having a great day!


Monday, 12 August 2013

Guest Post on The Lacquerologist!

Press Sample Purchased by Me

Good Afternoon loves!

You're getting a double post from me today! I'm still off on vacation. Today we will have docked in Vancouver, BC and will be getting off the boat. Since we have never been out to BC we're going to stick around for a few days just to take it all in!

Last Monday the lovely Emily did a guest post for me! When I asked her she immediately turned around and asked if I would return the favour to her! I obviously agreed because Em and I are tight like that. I'll give you a sneak peek at what I did for her here, but you'll have to head over to The Lacquerologist to see the rest!


Head on over to Emily's blog to see how I did it!

Sunday, 11 August 2013

Guest Post Karen of Nail Call

Morning loves!

Hope you are all having a great Sunday! Today is the last day on the cruise and we don't get off the boat today, just cruise on through until we dock in Vancouver tomorrow morning. I'm assuming it's been a great week and I hope my guest posters have kept you entertained! Today's guest post comes from the lovely Karen of Nail Call! I had the pleasure of meeting Karen last fall and we instantly became friends. She's just a complete sweetheart and I loved getting to meet up with her! Let's let Karen take it away!

*************************************************************************************

Hello all of Stephanie's lovely readers!

My name is Karen and I write a little nail art blog called Nail Call just "down the street" from Stephanie.
I'm so honoured that my friend & amazing blogger Steph asked me to do a guest post for her, because... she just, oh, I don't know... FINISHED HER HONOURS THESIS!!! Holy crap girl good for you!! And now she wants a vacation, sheesh!!

Just kidding, you deserve it! :)

For my guest post I wanted to create a look inspired by Steph, and I kept thinking of a conversation we had over twitter regarding water coloured manis (THIS mani of hers to be exact). I wasn't feeling the red at the moment, so I pulled out the summer brights!

Here's my first Watercolour mani:

I started with a simple base of Zoya Jacqueline and top coat (top coat is important here because the next step will involve acetone). Next I lightly dabbed/dotted the following shades one at a time: Chain Glaze For Audrey, Chain Glaze Peachy Keen, Essie Action, and Zoya Pippa. After each dot was created I dipped a random (and super cheap) paint brush into acetone and let the acetone flow into the dot I had made. I repeated until the nail was full, added a final coat of top coat and done.


Thank you everyone for reading, and thank you Steph for letting me guest post for you.

Bye for now & enjoy your vacation!

Karen

PS feel free to come over & say hello at Nail Call too :)

********************************************************************************************

Karen you are too kind! I love watercolour manis and this one is just fabulous! Thanks so much for being here today and if you aren't already you should head over and follow at Nail Call!

Hope you're enjoying your weekend lovely folks!

Saturday, 10 August 2013

Guest Post Brittney of Precious Polish

Morning loves!

Today we'll be in Ketchikan, Alaska! I don't know exactly what we're doing yet as far as excursions go, but I'm sure it'll be awesome regardless. Today's guest poster is another fellow Canadian, Brittney of Precious Polish! Brittney and I did the Geometric Challenge together back in February and I have been an admirer of hers ever since. She has an awesomely distinct nail art style that is always rockin! Let's let Brittney take it away!

********************************************************************************

Hi all! I'm Brittney of the blog Precious Polish and I'm super excited to be sharing some nail art with you today. When Stephanie asked me to write a guest post for her, I was instantly flattered, but also a little nervous since I've never written one before. My first thought was to do a geometric print, reminiscent of the geometric challenge that Stephanie started back in February. That challenge was incredibly fun and challenging, and I always enjoyed hunting for inspiration for each prompt.


While looking for a stellar geometric print, I stumbled upon this old favourite instead. These sunnies florals against a muted colour scheme had always caught my eye, so I switched gears and translated them onto my nails. I love the warm yellows contrasting with the pale mint, and the taupe outlines give the whole design a grounded, organic feel. I was a little apprehensive about taking on this design, but I love the end result and the bright yellow accent nail :)


For the floral nails I started with a base of OPI My Vampire is Buff. I painted the whole design with a tiny paintbrush and a white polish to help intensify the colours. Then I used American Apparel Sunshine State for the flowers, followed by American Apparel Manila for the secondary petals. I painted the leaves with American Apparel Office and then outline everything with American Apparel Mouse. I used American Apparel Sunshine State on top of white for my ring finger, and finished off the rest with American Apparel Office.


I hope you like these flowers as much as I do! I want to extend a big thank you to Stephanie for thinking of me, and giving me the honour and opportunity to write on her blog. Have a lovely day!

BRITTNEY XO

*********************************************************************************

How awesome is that print! It is completely going on my to try list! I want to thank Brittney again for being here today, if you aren't already following Precious Polish I suggest you head over there and start! :D 

Hope you are all having a great weekend! :D 


Friday, 9 August 2013

Guest Post Emma of The Globe and Nail

Morning friends!

Today I am in Skagway, Alaska! I'm hoping its been a great trip so far and that I've seen lots of great glaciers and wildlife. Today's guest post comes from the fabulous Emma of The Globe and Nail! Emma is a fellow Canadian blogger and has the most gorgeous nails that I am totally jealous of! I'm thrilled that she is here today so let's let her take it away!

******************************************************************************

Hi everyone!  I'm Emma from Globe & Nail, and I'm super excited to be posting here on Sincerely Stephanie today!  :)  I really love reading Stephanie's blog because she always comes up with such fun manicures (and is a fellow Canadian!) so I knew I had to do something cute and fun for today!  
I decided to try my first rainbow gradient, and I absolutely fell in love!  I started with a base of OPI My Vampire Is Buff (I would have used My Boyfriend Scales Walls, but MVIB was sitting on my desk and I was too lazy to fish the other one out of my helmer, haha) and added a coat of Seche Vite to speed up the drying  before sponging on the gradient.  
I used six polishes for this gradient; from thumb to pinky, they're piCture pOlish Peaches n' Cream, LaCC 2011, piCture pOlish Honey Dew, OPI Can't Find My Czechbook, LaCC 1972, and piCture pOlish Twinkle.  
It was kind of tricky to get a smooth gradient when blending horizontally instead of vertically, so to blend the gradient a bit more I added a coat of WingDustCollections Dancing Queen on top.  I really think it pulled the look together!  The glitter is much more holographic that my photos show, and it looked super awesome in the sun!  :) There's a coat of Seche Vite on top to smooth it all out.  
Thanks for having me here, Stephanie, and I hope you're having a nice break!  If you liked this post, I'd love it if you came and visited me over at my home on Globe & Nail!  :)


****************************************************************************************

How cute it this?! I love the rainbow gradient and the added glitter really takes it to a whole other level! I want to thank Emma again for being here and if you aren't already you really should be following Emma over at The Globe and Nail! Head there now to check her out!

I hope you are all having a fabulous day and enjoy the start to your weekend!

Thursday, 8 August 2013

Guest Post Kelsie of Kelsie's Nail Files

Morning friends!

It is day 4 of my Alaskan cruise and today we are docking in Juneau and then sailing by the Sawyer Glacier. eeeeekk! I'm hoping I'm having as much fun as I'm dreaming ;)

Today's guest post comes from the fabulous Canadian blogger Kelsie of Kelsie's Nail Files! Kelsie actually guest posted for me last year as well and I am just thrilled to have her back again. She is such a sweetheart and posts some amazing nail art! Like craazzzyyy talented! Let's see what she has in store for us today!!

*********************************************************************************

Hello again! For those of you who missed my first guest post on Stephanie’s lovely blog, I’m back and I can’t believe it’s been almost a full year since then. I’m the Kelsie behind Kelsie’s Nail Files, and I am so thrilled to be here!

Stephanie continues to be one of my favorite nail art bloggers… I constantly draw inspiration from her work :)

Of course I said yes when she asked me to guest post for her while she takes a much needed vacation from school and blogging.

 Today I want to share with you a new treasured polish of mine… Shimmer Polish Irene. It is a gorgeous nude glitter with multicolored micro-glitter that reminds me of the beach!


This is two thin coats of Shimmer Irene layered over one coat of OPI Berlin There, Done That. To be honest, Shimmer Irene is a dense glitter that could cover the nail without the base color if necessary.


This is definitely one of my favorite polishes and not just because my mom's name is Irene :P 
However... being the nail art enthusiast that I am I could not leave my nails with just plain polish (even though there’s nothing “plain” about that glitter)… So I added a new stamp of mine, Konad M-78 using Konad special black polish.


And there you have it! I did wear this to the beach one day and it was absolutely stunning in the sun! :)

I want to say a huge thank you to Stephanie for hosting me on her blog, and I wish her all the luck with her upcoming Masters degree! :)

*********************************************************************************

Wow! Irene is stunning! And the stamp just goes with it perfectly. I'm loving this whole look :) A huge thanks again to Kelsie for guest posting! If you're not already following her, get your butt over to Kelsie's Nail Files and start following! Hope you're having a great day loves! 

Wednesday, 7 August 2013

Guest Post Heather of Peace, Love and Polish

Morning friends!

Today I am getting off the cruise ship at Icy Point Strait and hopefully doing some really cool excursions! While I'm off doing that I have the lovely Heather of Peace, Love and Polish taking over for me today! Heather is another member of the Digit-tal Dozen group and I'm so glad to have met her through this. She is super sweet and turns out some awesome manicures! Let's let Heather take it away!

*************************************************************************************

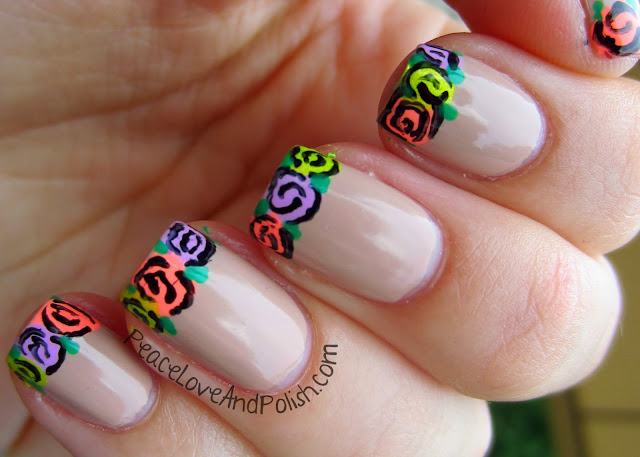
Hey guys! It's Heather from Peace, Love and Polish & I am so thrilled to be guest posting for the amazing Stephanie! I certainly jumped on the bandwagon to help her out with a post! I wanted to do something fun, but also something that I love to wear on my own nails - so that means two things, flowers and a french mani. So why not combine them both!?


I started with a base of Zoya Avery, then added blobs to the tips of my nails using Fresh Paint Guava (pink/orange), Fresh Paint Passionfruit (purple) & China Glaze (yellow). I then took a thin brush and some black paint to outline the random blobs into flowers. I finally added some tiny green leaves, then a quick top coat of Seche Vite. I love the way it looks!


Thanks again Stephanie for having me! I hope you all enjoyed this mani :)
-Heather

*************************************************************************************************

How cute is this!? I never end up doing french tip manis because I can never get my lines even, but this is brilliant! I will most certainly be adding this to my to try list! A huge thanks to Heather again for guest posting for me! If you are not already following her, then get over to Peace, Love and Polish and check her out! Hope you are all having a wonderful day my loves!

Tuesday, 6 August 2013

Guest Post Debbie of The Crumpet

Morning loves!

Today's wonderful blogger is the absolutely amazing Debbie of The Crumpet! Debbie is the great mastermind behind the Digit-al Dozen and really is one of the sweetest people in the community. I'm so glad I've had the pleasure of getting to know her and that I can call her a dear friend of mine! Let's let Debbie take it away!

*********************************************************************************

Hi Goddesses


I'm Debbie, from The Crumpet, and I'm thrilled to be Stephanie's guest blogger today :)  I've known her for a little while (it actualy took me a while to realise the girl I was chatting to in the FB group was one of my fave bloggers lol) and she's now a dear friend and co-member of the Digit-al Dozen.


I've been a little obsessed with neons lately, and this is something that "happened" the other night.  I'm not really sure what style you'd call this, but I love the feathered effect, and it reminds me of Native Indian patterns.


This neonorama uses a white base (lately I'm loving NYC), Sally Hansen Limestone, OPI The It Color, w7 Flourescent Pink and OPI Roll In The Hague.


I then took a small striper brush and featherstroked the colours on in a chevron pattern.  I started with the Limestone on each nail, and then picked another colour, applying it where I wanted it on all 5 nails, than another and so on.


I really love this finished effect.  It's a great example of something that's considerably less complicated than it looks, and the neons .... well, they're still making me smile :)


Enjoy xx


*******************************************************************************************

Love it! Neon looks are always such a win with me and the ikat look is fab! If you aren't already following Debbie on The Crumpet you should scoot over there and give her a follow! Thanks so much to Debbie for guest posting for me today! I hope all of you lovely readers are having a great day!

Monday, 5 August 2013

Guest Post Emily of The Lacquerologist

Goooooood Morning Friends!

Today starts my vacation! I am in ALASKA for the next 7 days on a cruise! I am so excited to be here. We arrived late last night in Anchorage and the cruise leaves this evening from Whittier. I am such a geography nerd so I am really excited to see all the glaciers and the wildlife. It will be an amazing experience I'm sure!

Since I am away without internet access I have enlisted an absolutely fabulous lineup of bloggers to entertain you all while I'm away. First up is one of my best blogging friends Emily of The Lacquerologist! Emily and I 'met' way back in April of 2012 and hit it off instantly. Since then we have done numerous challenges together and remain good friends. Emily has such a fabulous distinctive nail art style that I greatly admire. Also shes a nail tech! So she really knows her stuff. I'll let Emily take it away!

*********************************************************************************

Hello there Sincerely Stephanie readers!  This is Emily from The Lacquerologist, and I am thrilled to be guest blogging once again here on Sincerely Stephanie!  I just adore Stephanie and her distinctive nail art style, and I am thrilled to be here! =) 

Today I have some funky tribal style nails for you, with a POP of color!  Let's take a peek...


I started this manicure with two coats of Wet N Wild Wild Shine French White (my go-to white polish) on all of my nails except my accent nail.  I then used my trusty It's So Easy StripeRite in black and Wet N Wild Wild Shine Black Creme to create the tribal designs.  I never really have a plan with these sort of designs...I just start and see what happens!  For my accent nail, I did a gradient with the black Wet N Wild polish and Barielle Magna Cum Laude Turquoise!  I sealed everything in with Out the Door top coat.


Tribal style nails may seem complex, but really if you just take your time with your striper, they aren't too difficult.  It's so fun to be creative and try out new designs!

Like what you see?  Check out my blog [here] and my Facebook [here]!  Thanks so much to Stephanie for having me today and I hope you all have a fantastic polished day! =)

*********************************************************************************

How awesome is this! I love tribal designs and Emily hit it on the nose with this awesome look! The blue to black gradient accent really pops against the white tribal nails as well. If you aren't following Emily by now you should really start! I hope you are all having a great day and thanks to Emily for being here!

LinkWithin

Related Posts Plugin for WordPress, Blogger...