Showing posts with label bundle monster. Show all posts

Tuesday, 23 April 2013

Psychedelic Holographic Stamping

Press Sample Purchased by Me

Happy Tuesday! So as some of you may have seen on my Facebook page, yesterday afternoon I finished my last undergraduate exam!!!! And it went fairly well if I do say so myself! I'm really excited and now have about 2 weeks before my summer semester starts, where I'll be writing a thesis to finish off my degree. This is why I've been slightly MIA lately, needed to study for that crazy thing!

So what do you wear when you're done your exams?! Holographics of course! Once I had swatched the China Glaze Hologlam Collection I was interested to see if they would be suitable for stamping, so perfect opportunity here.

holographic stamping

Turns out that yes! China Glaze Strap on Your Moonboots is great for stamping!

holographic stamping

I used Revlon Bare Bones as my base, which I am kind of obsessed with as a nude lately, and then stamped with BM-221 and Strap on Your Moonboots. Super simple and I'm loving the effect!

holographic stamping

I love the psychedelic look of the stamp and with the holographic polish it looks even cooler! Do you like this look? Would you wear your holographic polishes stamped?

Well I'm going to be relaxing and playing with my puppy all day and hopefully starting a book! Any good suggestions out there?

I hope you're having a great Tuesday!

Friday, 18 January 2013

Nude and Purple X'es

Morning ladies! When I first tried the China Glaze Tranzition polishes I thought that they would work really well for stamping. So the other day I was looking for something quick and easy so I decided to whip out my stamping plates and give China Glaze Shape Shifter a try!


I started with OPI Did You 'Ear About Van Gogh? and then stamped with Shape Shifter and BM-203. And I am happy to report that this worked beautifully as a stamping polish!


The only downfall to stamping with these polishes is that the colour will change when you add topcoat. Luckily I like the deep metallic purple better than the smoky grey colour Shade Shifter is without topcoat.


I quite like these refreshing manicures after some crazy and intense nail art! Although they never seem to last for more than 24 hours lol! What do you think of more simple looks like this? Like my nude and purple x'es?

I hope you are all having a fabulous Friday! Any one have anything special planned? I'm headed home for the weekend!

Products in this post provided for my honest review.

Friday, 11 January 2013

The Digit-al Dozen Does Art: Black and White Squares

Good Morning my loves!

Today is the LAST day in The Digit-al Dozen Art week and I have to say I am rather happy this week has come to a close. It has been a challenge to come up with some cool inspiration pieces, but challenges should be challenging! I struggled hard last night trying to come up with something and even completed a mani and then took it right off and looked for new inspiration. I eventually found some really interesting black and white squares which translated beautifully into skittles.


Here is my inspiration image that I found on Google.


I am quite fond of this type of work. I have even seen this kind of thing done where small pizza boxes were covered and then placed on the wall. Art for a university budget. I can see something like this in my house someday, I love mixing and matching prints as you can probably all tell from my love of skittles.


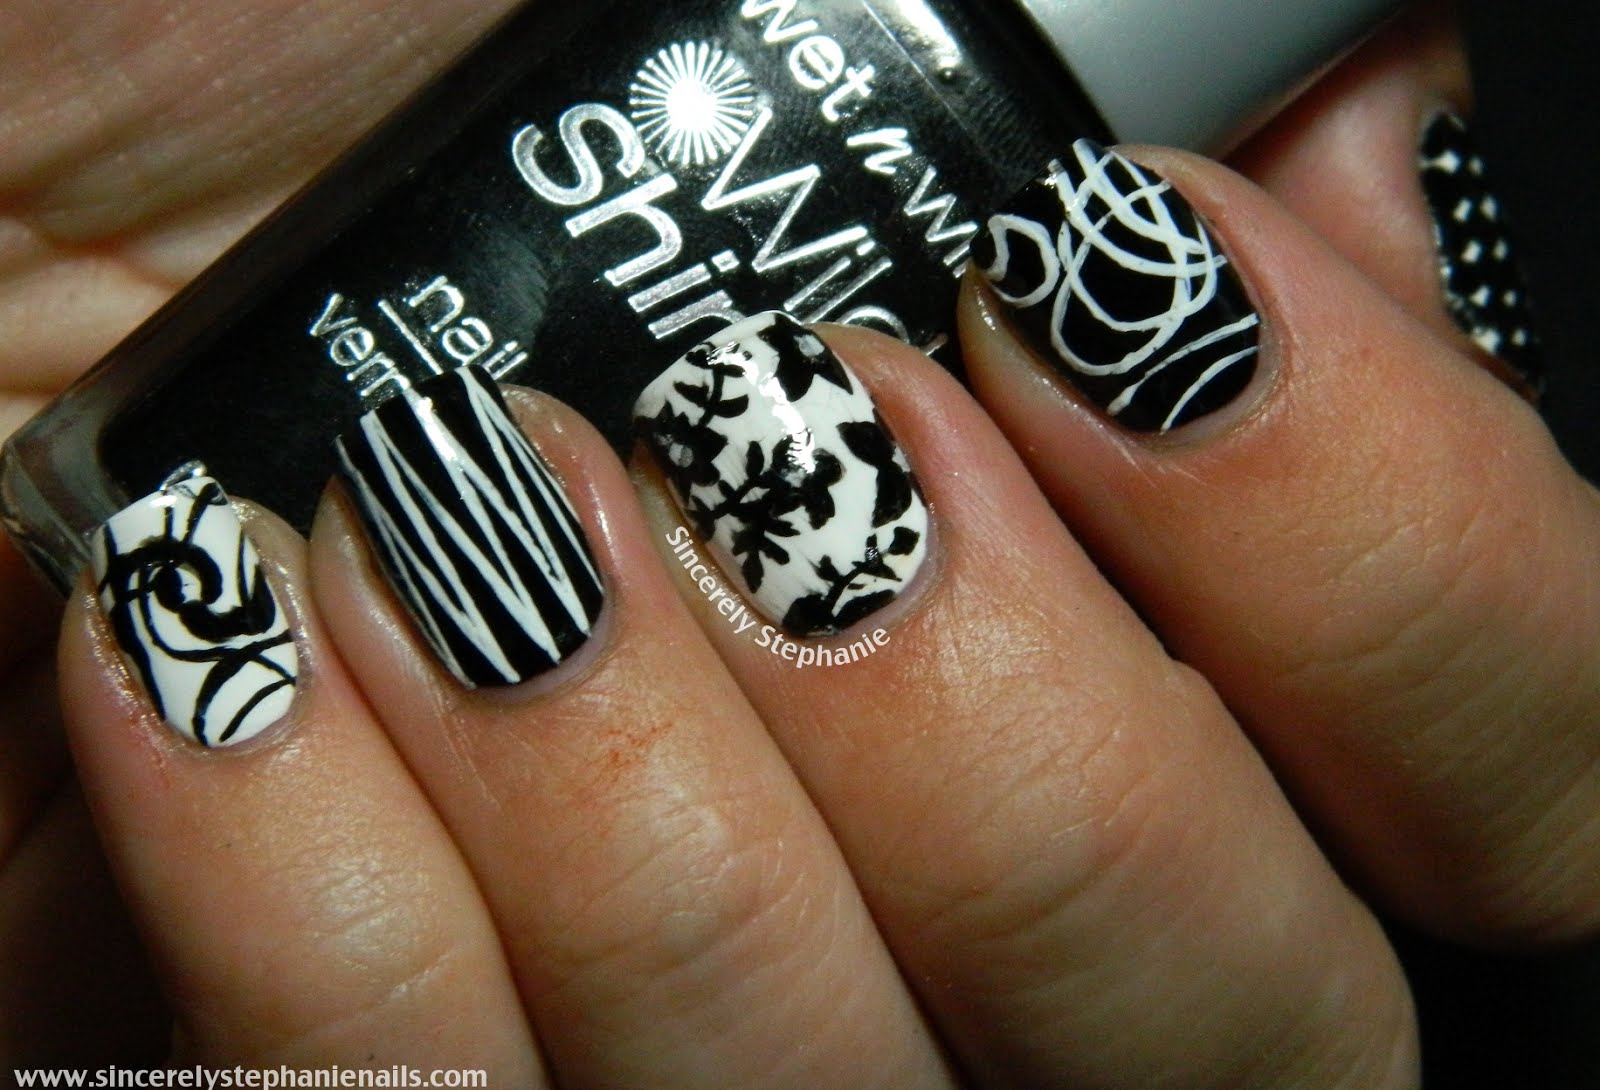
I did all these nails using Wet n Wild Black Creme and Milani White On The Spot. I used dotting tools, my mid-length striping brush and my cut down little brush to do all the work. On my right hand ring nail I stamped with Born Pretty store black stamping polish and BM-314 I believe.


You guys will be proud of me, I even managed to do my right hand AND get a semi decent picture of it! Check it ouuuttttttt


Still have an awkward hand pose, but my right hand never gets quite enough action on here to learn how to properly pose. How about a cool both hands picture?!

What do you think of my black and white skittles? Would you ever put up art like this in your house?

Make sure you check out the rest of the Digit-al Dozen! They have been kicking it up all week and I can't wait to see what they came up with today!

Tuesday, 18 December 2012

Palette Cleanser Snowflakes!

Morning! Today I have some simple, holiday nails I did. I want my nails to be holiday themed ALL THE TIME, but I had a big presentation to give in front of some big names at the office so needed something really subtle and clean. This is what I came up with!

snowflake nail art


I used 3 coats of Essie Marshmallow as my base, which I still think is the most perfect polish. Squishy, white jelly goodness, yes please! Then I stamped with BM-313 and Essie As Good As Gold.

snowflake nail art


This was just what I was looking for! Unless you really looked at it, the snowflakes were really subtle and my nails just looked clean. The squishyness of Marshmallow reminded me of freshly fallen fluffy snow.

snowflake nail art


These are perfect if you can't wear bright crazy colours at the office, but still want your nails to be in the holiday season.

Do you like the subtle holiday look? What kinds of holiday nails have you done?

Monday, 10 December 2012

Subtle Shimmer Stamping

Afternoon folks!

Today I have some quick stamping nails that I did a few weeks ago. I was feeling a subtle look and this is what I landed on.


I started with 3 coats of OPI My Boyfriend Scales the Walls, the perfect off white. Then I added a coat of Essie Kisses and Bises which is a sheer duochrome flashing between pink, red, orange, gold and even green on really extreme angles, which of course does not photograph correctly lool. Then I stamped with Essie Good As Gold and BM-314.


I really like palette cleansers like this every now and then. Kisses and Bises just took it up a notch for me too. I also seem to be obsessed with stamping with Good As Gold. I have used it twice more since these nails to stamp. I'm just a little obsessed with gold on my nails haha.


Well what do you lovely ladies think of these? Do you ever need a palette cleanser? I hope you are having a great day :)

Friday, 16 November 2012

Geometry Rocks

Hey Guys!

Today I have a pretty wicked stamping mani that I did a week or so ago to share with you. I had finished swatching for the night and needed something with a little in your face awesomeness so I turned to my stamping plates. I pretty much just pulled out a bunch of random plates with all sorts of geometric patterns and went to work!

geometric stamping


I used my go to Milani White On The Spot on all my nails and then started to stamp! I started with BM19 and Sally Hansen Insta-Dri Vigorous Violet on my pinky. Then I used BM-322 and Wet n Wild Black Creme for the awesome houndstooth on my ring nail. I loved this so much that I stamped with it again on my thumb. Seriously this stamp will be making another appearance. It's awesome. On my middle nail I used MASH-45 and Essie Watermelon to give it a little more colour. Finally I finished off by going back to black and using BM-319. End result = super awesome geometric look.

geometric stamping
geometric stamping


Please ignore the little bit of overlap on my index nail. For some reason sometimes when I stamp the image seems to 'jump' a little and I end up missing the tip of my nail and have to restamp that part. I'm sure I'm just not lining it up right, but I think I am each time! lol!

geometric stamping
geometric stamping


One thing I loved about these nails is when I showed them to my mom she instantly asked me to do the exact same on her! I was shocked! She was going away for the weekend and she said she's never received so many compliments from random people and cashiers and the like. I wore these for 4 days because I just liked them too much to take off.

geometric stamping


What are your thoughts on geometric stamps? Do you like this kind of skittled stamp look?

Hope you are having a wonderful Friday my dears! :) Woohooo Weekend!

Tuesday, 23 October 2012

Icy Purple

Hey guys! Today I've got some nails that I did a week or so ago. I wasn't entirely thrilled with the end result and my pictures are not my best work. I had about half an hour before I needed to leave to go curl and figured I could whip up a quick layering manicure with an stamping accent. Wrong! But alas here are my nails!

purple stamping


I used Sephora by OPI Just a Little Dangerous on my nails except my index and ring, which are sporting Milani White On The Spot. I then added a coat of Daring Digits Ice which is an iridescent clear flakie that flashes blue and purple over all my nails except my ring finger. I added the silver square stud at the base of each nail to give it a little more visual interest. I stamped with Bundle Monster 205 and Wet n Wild Black Creme.

purple stamping


Ice plays a lot better over darker colours, as even in real life you couldn't see it over the white base. I would almost describe Daring Digits Ice as being Cult Nails Seductions infant sister. The flakies were similar in my opinion, except Seduction is in a purple base and Ice is completely clear. So maybe not sisters, but cousins...twice removed... lol I'm on a roll today.

purple stamping
purple stamping


I think the idea of these nails were much better in my head than in the final execution. But alas that happens! I almost didn't show these to you, but last night I went to bed without editing any pictures, so I decided to throw this out there are see what you all think!

So what are your thoughts on this!? Fail or did it have some potential?

Hope you're having a wonderful day :)

Products in this post were provided for my honest review. 

Friday, 19 October 2012

Glitter, Skulls and Herringbones

Today I have some nail art inspired by a few different manicures that I've seen around. I was digging through my inspiration folder the other night and came across this utterly amazing manicure done by Very Emily and knew that I was going to do nails inspired by it. I have also seen an amazing herringbone print on a few blogs lately from the tutorial by Miss 80 Million on YouTube. I really wanted to do both of these, so I put them together to create a mash-up of inspired nails!

red glitter skulls


To emulate Emily's look on my index and pinky nails I used Orly Christmas and while the second coat was still wet I sprinkled on some loose red glitter from Dollar Tree. On my middle nail I used Wet n Wild Black Creme and then freehanded on the skulls and x's using a striping brush and Milani White On The Spot. For my herringbone nails I followed the tutorial and used White On The Spot as my base then stamped with Black Creme and BM-201. I added the lines with It's So Easy Stripe Rite Black.

red glitter skulls


I had NO idea how the loose glitter was going to play with top coat so please excuse the glitter all over my hands, I wanted to snap a few pictures before adding any in case it was a hot bleeding mess.

red glitter skulls
red glitter skulls


Thankfully with topcoat I loved these nails even more! The topcoat really brought out the sparkle and shine from the loose glitter and I was staring at these allll day long. I used a coat of Gelous and then 2 coats of NYC In a Minute Top Coat. Loose glitter is hunnnnnggrrry. It really likes to nom on top coat because I had to add another coat in the morning because my nails were crazy bumpy even with Gelous and 2 coats of NYC.

red glitter skulls
red glitter skulls


I quite like the combination I came up with here! My skulls aren't near as good as Emily's but I really do love the skull and glitter combination. It's so fun with just that touch of rock.

What do you think of these? Are you ever inspired to mash-up two manicures you love to create something new?

Hope you're having a lovely day!

Monday, 15 October 2012

A Breath of Fresh Air

After all the dark and crazy nail art that I do, sometimes I feel like my nails need a breath of fresh air. That was the thought I had in mind when I sat down to do these nails.

subtle stamping


I pulled out my absolute favourite OPI My Boyfriend Scales the Walls, I'm going to need a back up bottle of this baby! Anyone want to send one my way ;) and then stamped using BM-09 and Essie Penny Talk from the Mirror Metallics Collection. I was aiming to create a half moon of sorts with the stamp and I purposely didn't stamp the whole image onto my nail.

subtle stamping
subtle stamping


The hardest part about these nails was trying to line up the stamp to be in the middle and halfway down my nail! I by no means got it perfect, but I still really enjoy this look. Penny Talk is absolutely perfect for stamping and the metallic finish is beautiful against the grey white of MBSTW. While I was wearing these there was an extra shine on the stamped image against the creme of MBSTW that I was just loving.

subtle stamping
subtle stamping


This was the perfect refresher for me before I start delving into some crazy Halloween nail art, which I am sure that I will be doing quite soon.

Do you ever need to take a minute and wear something light, soft and delicate on your nails instead of a bright or vampy shade? Let me know what you think!

Hope you're all having a good Monday!

Saturday, 13 October 2012

My Bundle Monster Halloween Fright Night Entry!

Happy Saturday folks! Today I've got the nails that I entered in Bundle Monsters Fright Night Halloween contest to share with you. I really liked these nails, and even though I am not that great at stamping I had fun coming up with these!

bundle monster fright night halloween nails


You had to create nails that were inspired by the theme Fright Night and you needed to use at least one Bundle Monster nail art accessory in your design. I whipped out my stamping plates and pulled out every halloweenish looking design in my book. Then after studying them for about 20 minutes and trying to come up with something I noticed that there are a lot of scary animals associated with Halloween! So I decided to create a scary animal themed mani.

bundle monster fright night halloween nails


I started off with 2 coats of OPI Skull and Glossbones and then created a gradient with Wet n Wild Fergie Glowstick to get a ghoulish glow going on. I did all my stamping with Wet n Wild Black Creme and Konad Special Polish White. On my pinky I used BM-224 for a haunted house that all these creepy creatures live in. On my ring I stamped with BM-314 for a devilish bat. On my middle nail I stamped with BM-225 for a skull and bones look. My idea was that the bat or spider had just devoured him, but I don't think it came across as much. My index I stamped the cobweb and spider with BM-13 and the skully fish that the spider is devouring from BM-04. I finally wrote Fright Night in shaky letters on my thumb with It's So Easy Stripe Rite Black.

bundle monster fright night halloween nails


I added the red rhinestones in the eyes of the bat, skull and on the back of the spider just to up the creepster vibe. I was going for the red beady eyes that you see in haunted houses and cheap horror movies LOL!

bundle monster fright night halloween nails


I had a lot of fun making these, and to be honest it was a challenge! My mind doesn't go to stamping right away when I think of nail art so this was thinking outside the box for me. I hope you guys like what I came up with!

You can vote here for your favourite Fright Night nail art, and here is where my entry is! I would love it if you all vote for me :) But don't feel obliged if you don't like my nail art! I'm super excited to see the rest of the amazing entries! I'm sure they will all be awesome!

Have you done any stamped Halloween nails yet? Do you like these? Hope you're having a great day :)

LinkWithin

Related Posts Plugin for WordPress, Blogger...