Showing posts with label christmas. Show all posts

Sunday, 30 December 2012

Christmas Nails Galore!

Hey Friends! I ended up doing a few of my friends and family's nails over the holidays so I thought I would share these all in one post with you :)


I did these on my friend Sam, she saw the gold snowflake stamping I did on myself and asked to have the same thing done on her! I used Essie Marshmallow and Essie Good As Gold with BM-313


I did these for my friend Heather! She just let me do whatever I wanted so I started with the cutest santa ever on her ring nails and then freehanded some red snowflakes over China Glaze Glistening Snow. Doesn't she have the most gorgeous long nail beds?! I wish my nails looked like that :)


I did these on my sister! Her dress for Christmas was a gorgeous blue so we decided on some blue skittles to match. The base is Essie Mesmerize, on her index the stamp is BM-313 and Pure Ice Silver Mercedes. Middle nail is a gradient of the two polishes, ring is a bunch of rhinestones and studs from Born Pretty Store and her pinky is Harlow & Co. Misfits. They matched her dress really well!


These are my nails! My original idea for Heather was to paint the same white snowflake on top of the red one, but we both liked the red snowflake so we left hers alone. I was wearing butter LONDON Fairy Cake alone and once I had finished hers I wanted to try it out on myself quickly. I had planned on adding to this the next day, but I used glue as my basecoat and my nails fell off before I could add anything!

What were you wearing on your nails over Christmas? I'll have my Christmas nails up hopefully later today! :)

Monday, 24 December 2012

Merry Christmas!

Merry Christmas to all my lovely readers and friends!

I have no new nails for you today, I just haven't had any time to sit and edit photos! This season is just toooo busy lol. But I wanted to stop in and wish you all a very merry Christmas and a wonderful next few days.

I'll be taking a bit of a blogging break to enjoy time with family and friends. So enjoy your time with family and I hope Santa is very good to you all!


Love you all! <3

Saturday, 22 December 2012

Zoya Gilty with Some Christmas Embellishments

Gooooood Morning loves! I am DONE my co-op! No more hour and a half commute both ways each day. I am REALLY looking forward to getting to sleep past 5:45 for the next little while. :D

Today I have an amazing polish to share with you, Zoya Gilty. Ever since the gold top coat trend started I really wanted to get my hands on one. However the $30+ price tag was really holding me back. I love polish, but I need to be able to pay for tuition lol. So when I was lucky enough to win Week 2 of Nail Polish Canada's Holiday nail art contest I literally jumped for joy knowing that a gold topcoat would be mine!

zoya gilty


I decided that I actually needed to wear this polish. No swatching here. So on Sunday night I finally say down and put on two coats of China Glaze Running In Circles and then added Zoya Gilty. The green and gold combination is to die for. I'm hooked on it! I felt so luxurious with real 18K gold on my nails. There is just no other way to describe it.

zoya gilty


I'd been wearing this for 2 days, and generally that's as long as I can leave something on, but there was a part of me just begging myself not to take it off. So I embellished it!

zoya gilty nail art


I started with the thought in mind to just add the rhinestone and bullion bead bows just on my ring nail and thumb. Then something in me wanted to make it into a skittlette! Since I didn't want to screw up my right hand I just painted over what was already there with OPI The Spy Who Loved Me on my middle nail and Essence A Piece of Forever on my pinky. I left my index nail alone to give Gilty the spotlight.

zoya gilty nail art
zoya gilty nail art


I actually can't believe how many compliments this manicure got. Everyone at the office was grabbing my hand being like no you didn't do this? The cashier at the grocery store freaked out a little too when I told her that I did them myself. lol AND I got my right hand to match! Don't believe me? Here's PROOF!

zoya gilty nail art


I wore these for another 2 days until my thumb popped off and I couldn't walk around with a bare thumb. I almost wish these had been my Christmas day nails. I'll have to come up with something else now.

zoya gilty nail art


I really do love these and they felt so festive! What do you think of my Gilty embellished nails? Would you wear something like this during the holiday season?

I can't believe we are so close to Christmas! This year has really snuck up on me. I hope you are all having a wonderful holiday season my dears!

Wednesday, 19 December 2012

Wal-Mart Wednesday: Reverse Fishtail

Welcome to another installment of Wal-Mart Wednesday! Today I am excited to show you what I think is a new look, the Reverse Fishtail!

reverse fishtail


We've all seen the fishtail nail made famous by Sarah of Chalkboard Nails. So I decided to turn it on its head for a little reverse fish action. These were super easy to create, the hardest part will be clean up!

reverse fishtail


I started with Sally Hansen Insta Dri Co-Balt Blue. Then I used Pure Ice Silver Mercedes and leaving a third of my nail at the top swooped in down towards the middle of my nail. Then swooped down on the other side and filled in on either side. Then I used Sally Hansen White On to do the same thing about two thirds of the way down my nail. I felt like the white area was a tad stark so I went over it with Wet n Wild Break The Ice to add a little shimmer. Just follow this tutorial and flip it upside down to get the reverse fishtail look!

reverse fishtail


For my accent nail I did two coats of my favourite silver Sally Hansen Celeb City and then used loose blue glitter to create a snowflake!

reverse fishtail


I'm loving the reverse fishtail look and this is actually the second time I've worn it! I originally came up with it as an accent nail in a skittle look which I'll show you this afternoon! It's super easy and all you need is the polish brush. Nail art anyone can do! :D

What do you think of my reverse fishtail with a snowflake accent look? Is the reverse fishatil something you would try out?

Hope you're all having a fab day!

Tuesday, 18 December 2012

Palette Cleanser Snowflakes!

Morning! Today I have some simple, holiday nails I did. I want my nails to be holiday themed ALL THE TIME, but I had a big presentation to give in front of some big names at the office so needed something really subtle and clean. This is what I came up with!

snowflake nail art


I used 3 coats of Essie Marshmallow as my base, which I still think is the most perfect polish. Squishy, white jelly goodness, yes please! Then I stamped with BM-313 and Essie As Good As Gold.

snowflake nail art


This was just what I was looking for! Unless you really looked at it, the snowflakes were really subtle and my nails just looked clean. The squishyness of Marshmallow reminded me of freshly fallen fluffy snow.

snowflake nail art


These are perfect if you can't wear bright crazy colours at the office, but still want your nails to be in the holiday season.

Do you like the subtle holiday look? What kinds of holiday nails have you done?

Monday, 17 December 2012

It's My One Year Blogaversary!

WOW! I can't believe it has been a year sine I did my first nail post here on Sincerely Stephanie. When I started this blog I essentially knew nothing about nails, I kind of just jumped in with both feet and learned as I went. I made a lot of mistakes, but hey blogging is all about learning! I'm learning more each and every day.

For today I wanted to do something special but wasn't exactly sure as to what. So I looked back at my first post and decided to kind of recreate it! What was the first ever post on here, why it was Candy Canes!

candy cane nail art


Here are my 2012 Candy Canes. I went with Milani White On The Spot as my base and then did my diagonal stripes in China Glaze Merry Berry and China Glaze Running In Circles. I did these with my medium length striping brush!

candy cane nail art
candy cane nail art


Looking back I can't believe what has happened this past year. My nail art skills have improved enormously, and I have made some wonderful friends. I've had the honour of winning multiple nail art contests, I've been able to give away some awesome prizes to my fabulous readers and I've even got to meet some bloggers in person.

candy cane nail art
candy cane nail art


On top of everything I can't believe that there are over 1000 people that have decided to follow me via GFC! Plus over 1100 likes on Facebook. It honestly blows my mind. All of your comments make my day every day. You should see when I'm with my friends and I get a super awesome comment, I just start smiling big and gushing over how great you guys are.

Let's take a look back at my first ever Candy Canes shall we?

candy cane nail art


I remember how proud I was of these and I still am! This has been an incredible journey so far and I plan on keeping up blogging for a long time to come!

I have no giveaway planned for today, but you can still enter The Beauty Blogazons Holiday Giveaway! In the next few weeks there is also, Christmas, my birthday and new years eve (which is the same day ;)). So in January to celebrate all this and 2013 I will kick off something great!

I can't wait to see what else this blogging adventure will hold for me. I really hope you continue to follow along and interact with me as I LOVE hearing from all of you always!

With SO MUCH LOVE
Sincerely Stephanie

Saturday, 15 December 2012

Dressed Up Like Christmas!

Second post today, I'm on a roll people. There are going to be a couple double posts in the next few days from me to catch up on when I was sick. Plus I just have a lot of content to get out to you fine folks before Christmas!

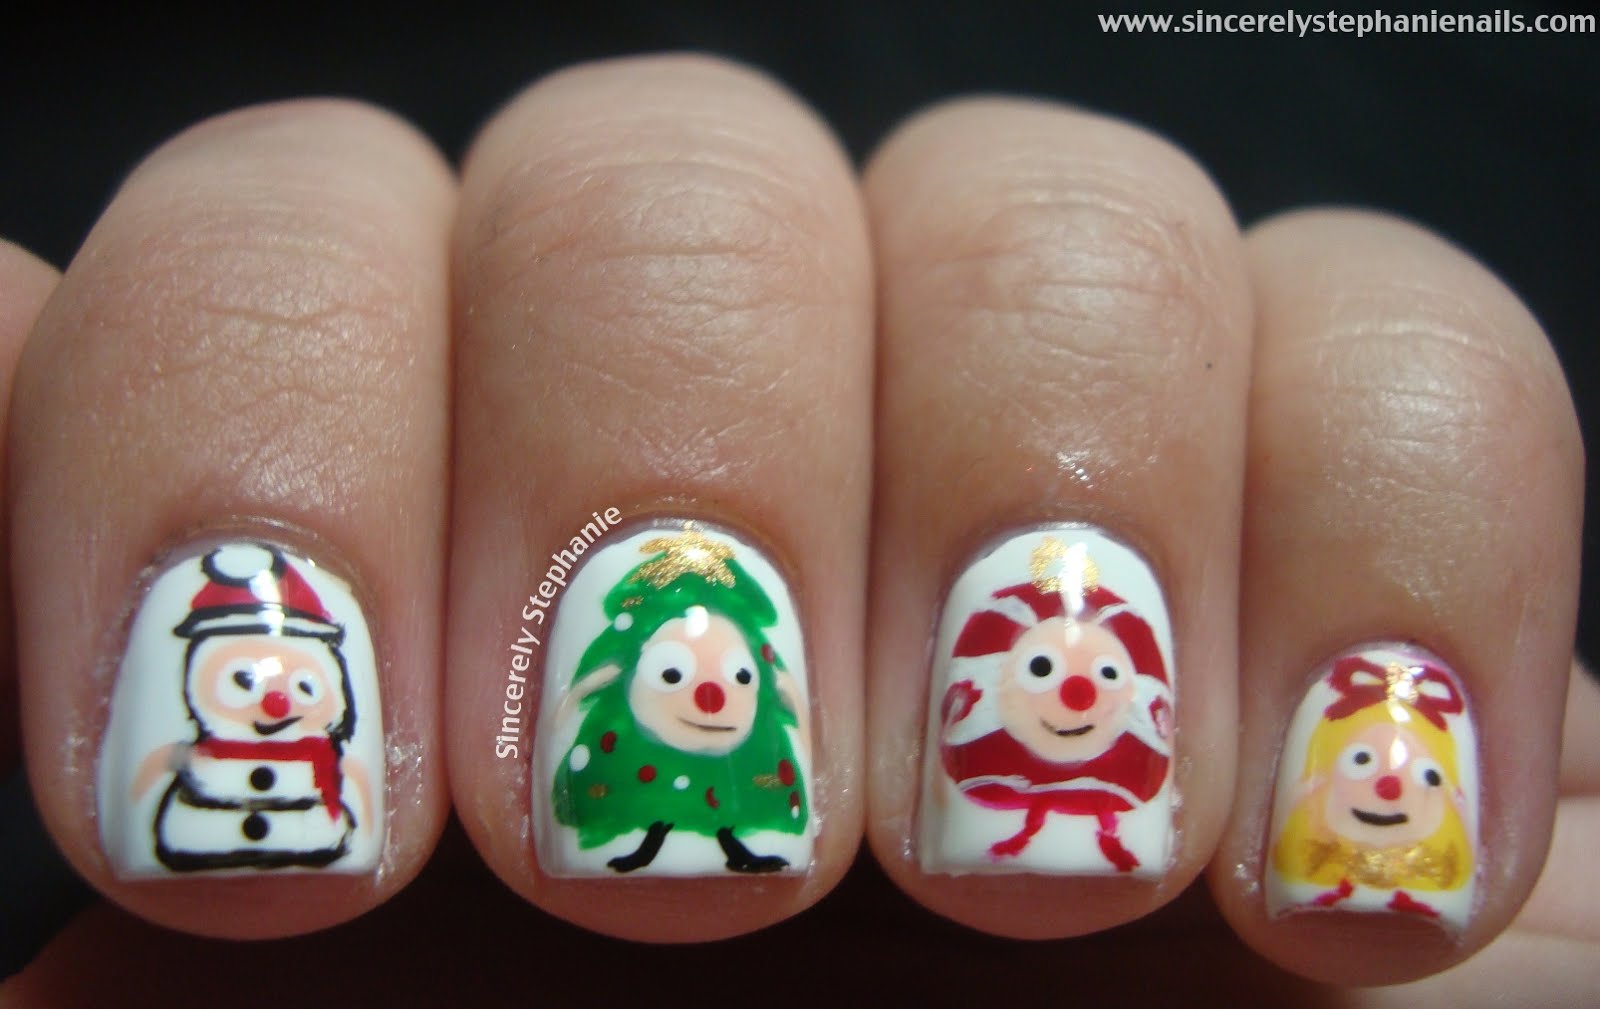
Today's nail art is insanely adorable. It's dressed up little people in Christmas things! I'll just show you :D


SEEEEEEE?! Do you love it?! Apparently I like putting little people on my nails this season. My thumb is a little man dressed like a Candlestick, index is a snowman, middle is a christmas tree, ring is an ornament and my pink is a bell.


To create these I freehanded them with some awesome brushes from Winstonia Store. They are sizes #0, #00 and #000. Its the first time I have seen a #000 brush and I actually loved it. It's just a little larger than my brush that I cut down.


I had sketched these little guys out first so painting them wasn't too hard, but I'm not going to go into details about each one. The polishes I used are listed below:
Milani White On The Spot
Sally Hansen Insta Dri Lightening
Barielle Skinny Dip
Sally Hansen Insta Dri Rapid Red
Revlon Posh
Essence A Piece Of Forever
Wet n Wild Black Creme


I've entered these in Winstonia Store's Nail Art Contest. You still have time to enter and you can find all the details here! You can enter til the 20th and have a chance at winning some cute OPI Mini Sets!


I would love it if you headed over to Winstonia Store's page and 'liked' my mani! Or like the one that you like the most! Five people that just vote for entries have a chance to win a prize!

EDIT: Winstonia Store has created a 10% off coupon for all you wonderful people! It is SINCERELYSTEPHANIE. If you would like your very own brush set you can find them here for $8.95 for all three brushes and a 5pc double ended dotting tool set :) 

What do you think of my little dressed up men? Would you wear these lil guys on your nails? Hope you're having a great Saturday! :)

Products used in this post were provided for my honest review. 

Saturday, 8 December 2012

The Cutest Santa's Ever Tutorial!

Morning loves!

Today I have the tutorial for the Cutest Santa's Ever, which I showed you on Tuesday. These are seriously one of my favourite designs I've come up with and I'm super excited to share the tutorial with you!

Here are the nails that the video shows you how to create,


Here's the video! I hope like it :) If you create these nails, please share with me on my Facebook wall or on Twitter! I would LOVE to see them :)


So full disclosure, shooting videos is hard, especially without a tripod (fingers crossed I'll get one for Christmas!). Please forgive the little things in the video like my naked thumb haha.

I hope you enjoyed the tutorial and you can follow my YouTube Channel here!

Thursday, 6 December 2012

A Snowman and Some Flakes

Today I have some nails to show you that I did a week or so ago, but I'm just fitting them into the line up now! These were actually the first Holiday themed nails I wore!

snowman nail art


I used one of my favourite holiday polishes China Glaze Blue Bells Ring as my base. A one-coater. Love this polish. My original swatch is here. Then I set to work on my ring finger. It's a snowman peeking out from behind a snowbank!

snowman nail art


For the snowman I started by adding the white stripe on a third of my nail, I used Milani White On The Spot. Then using a dotting tool I created the basic shape of the snowman. I used Sally Hansen Insta Dri Rapid Red and a small detail brush that I cut down to make the scarf and the hat. I used Revlon Posh and White On The Spot again for the details in the scarf and the pom pom. I used a small dotting tool and my brush to create the mittens holding onto the snowbank. Revlon Sorbet and my favourite little brush to create the nose and finally Wet n Wild Black Creme and a dotting tool for the eyes and buttons!

snowman nail art


My original idea had been to do various Snowmen peeking out from different sized snowbanks, but I started these late and decided I would rather get some sleep, so I just drew on some quick snowflakes with White On The Spot and my little brush.

snowman nail art
snowman nail art


I love this little guy! I kept staring down at him while I was wearing it. And showing him to everyone that I saw LOL!

What do you think of my snowman and his flakes? Have you been doing any holiday themed nail art?

Wednesday, 5 December 2012

Red Knitted Sweater

Afternoon folks!

The other day I was browsing through Shutter Stock for some nail inspiration. Seriously this is such a great place to find inspiration! I came across a really cute Red Knitted Sweater that I thought would translate nicely into nail art. I'm not sure it completely came out how I was imagining, but I'm pleased with it!

red knitted sweater nail art


I used Orly Candy Cane Lane as my base which is a super glossy crelly red from the Orly 2010 Holiday Collection. This was my first time using this polish and I really like it! Two easy coats. The design is two reindeer, two evergreen trees and a snowflake on my thumb!

red knitted sweater nail art


For the details, all I did was take my needle point dotting tool and Milani White On The Spot and create dots following the pattern on the sweater. I like how my 4 fingers came out, but my thumb is another story. I got the top half of the snowflake, but I didn't clean my dotting tool enough on the bottom half so it doesn't look even at alll.

red knitted sweater nail art


You may notice my nails are super nubs right now. When I was wearing my Cutest Santa's Ever nails I got a major chip on my index nail. I had to file them down as short as they can be without bleeding. So I'll be rocking the nubbins in my next few posts! I like short nails, but these are suppaaa short.

What do you think of this design? Would you try something like this? Do you wear any knitted sweaters like this around Christmas?

This is the last day to vote in Nail Polish Canada's nail art contest! If you like my Christmas Wrapping Paper nails I would love your vote! Or vote for whichever nails you like best :) Vote Here!

Tuesday, 4 December 2012

The Cutest Santas Ever

Oh. Em. Gee. I love these nails. I wore them for 3 days and have been gushing over them ever since they were finished. Ok, I'm calm. Let me show you my super cute Santas!

santa nail art


How adorable are these?! I was sketching out a bunch of Santa's and once I came up with these I put them on my nails immediately. I started out with 2 coats of Milani White On The Spot. Then I created a little crescent moon in Barielle Skinny Dip right near my cuticle. Then I create a rounded triangle tip in Sally Hansen Rapid Red and filled that in.

santa nail art
santa nail art


I added the nose in Rapid Red by doing one big dot then two smaller dots on either side then going back with a striping brush to connect the outside of the dots and fill in what was left! I did black dots with a black creme for the eyes then added a white dot and did a small line in white for his eyebrows. His pink chubby cheeks were created with my largest dotting tool and by mixing the teeniest drop of Rapid Red in with Skinny Dip. I did his smile with a striping brush in black and then added his belt and the buckle in Sally Hansen Celeb City.

santa nail art


Gah these are too cute for words to me. I'm going to haul out my parents video camera and make a tutorial for these. Even though that was a crazy long explanation, they are actually super easy to create! I did them on both hands and they looked essentially identical. Awesome!

santa nail art


Well what do you think of my supa cute santas? My friends said they reminded them of those Russian nesting dolls because my nails are different sizes!

I'm so in the Christmas spirit right now. My house is pretty much completely decorated and I would listen to Christmas music alllll day long if I could, oh wait, I do! haha!

EDIT: I have created the video tutorial! It can be found HERE! :D If you create these please share them with me on Facebook or Twitter!

Are you in the Christmas Spirit?

EDIT: Voting is still open in Nail Polish Canada's nail art contest! If you like my Christmas Wrapping Paper nails I would really appreciate a vote! :D You can vote here!

Sunday, 2 December 2012

Christmas Wrapping Paper!

Afternoon dolls!

Nail Polish Canada is hosting an awesome nail art contest this month with some kick ass prizes! They invited me to participate and I was ecstatic to come up with some designs. Last week I had a design all planned out and unfortunately just ran out of time with the whole Black Friday shopping extravaganza! This week's theme is gifts, presents, stockings and anything to do with the awesome presents you want for Christmas!

I started brainstorming what I would really like for Christmas, and honestly there isn't much! One of my favourite things about Christmas is wrapping presents. I love giving things to other people and love wrapping them up! I spend lots of time picking out paper and bows and ribbons, my mom has even taught me how to make my own bows with big ribbons. What can I say I love Christmas! So I decided to create some wrapping paper on my nails!

wrapping paper nails


I googled Christmas wrapping paper designs and found some gorgeous paper, seriously wanted to print some of them off and start wrapping already! :D

wrapping paper nails


I used Sally Hansen Ion on my thumb, index and ring nails, on my middle nail I used Barielle Glammed Out Garnet and on my pinky I used China Glaze Merry Berry. All the gold detail was done with Essence A Piece Of Forever from the Breaking Dawn 2 Collection and the green is Barielle Date Night. All of the details were done with a tiny brush that I cut down to make even smaller :)

wrapping paper nails


My middle nail was supposed to be mittens and the string connecting them, but I'm not sure it played out as well. I think my pinky nail is my favourite. I might have to do a full set of nails like that soon!

wrapping paper nails


Well what do you think of my wrapping paper nails?! I had a lot of fun making them and now all I want to do is wrap a bajillion presents and make a million bows.

If you like these I would LOVE if you would head over to Nail Polish Canada and vote here for my nails!

I'm so excited it's December. Christmas and my birthday are this month so it's pretty much the best month ever. Hope you are all having a wonderful Sunday! Love you all!

Some products in this post were provided for my honest review

LinkWithin

Related Posts Plugin for WordPress, Blogger...