Tuesday, 30 October 2012

China Glaze Holiday Joy Press Release


Hey loves! The China Glaze Holiday Joy Press Release just came to my inbox and they looks so interesting that I had to share! Check them out below!

-----------------------------------------------------------------------------------------------------


MAKE YOUR MANI MERRY AND BRIGHT

China Glaze® Debuts 12 Glittering, Shimmering, Ravishing Colours for Holiday 2012

The holiday season: it is truly the most wonderful time of the year – for nails!  From gorgeous glitters to rich crèmes, ‘tis the season to add sparkle and shine to any manicure and pedicure.  Celebrate the season in colour with the new China Glaze® Holiday Joy collection!

Bringing tidings of good cheer, the China Glaze® Holiday Joy collection features 12 merry crèmes, glitters and shimmers including:

Glistening Snow – Fine diamond-like silver glitter

 Champagne Kisses – Bubbly rose gold glitter

Angel Wings – Delicate gold dust glitter

Winter Holly – Gold-flecked dazzling green glitter

Glitter All The Way – Exciting multi-color glitter

Pizzazz – Twinkling multi-dimensional glitter blend

 Blue Bells Ring – Icy blue shimmer

  Pure Joy – Fiery red glitter with gold particles

Red Satin – Silky blue-based red crème

With Love – Classic red crème with a hint of orange undertones

Merry Berry – Rich berry red crème

Cranberry Splash – Ruby red shimmer


The China Glaze® Holiday Joy collection also features 13 seasonally-inspired gift sets perfect for stocking stuffers, Hanukah gifts, Secret Santa, co-workers and Teacher’s gifts.  Gift sets include:


Ho Ho Ho: Merry Berry, Cranberry Splash, Red Satin, With Love, Pure Joy with First & Last base/top coat. MSRP $35.00

Holiday Charms: Mini bottles of Merry Berry, Red Satin, Winter Holly and Glitter All The Way. MSRP $16.00

Puttin’ On The Glitz: Cranberry Splash, With Love and Pizzazz. MSRP $14.00

 Keepin’ Cozy: Merry Berry, Glistening Snow and Cranberry Splash with fingerless gloves. MSRP $21.00

  Let It Glow: Champagne Kisses, Red Satin and Winter Holly with a pine scented candle. MSRP $21.00

 Brrr…It’s Chilly: With Love, Angel Wings, Pure Joy and a mini snow globe. MSRP $21.00

  Wings of Wonder: Blue Bells Ring, Champagne Kisses and Cranberry Splash with an angel key chain. MSRP $21.00

Santa Paws: Red Satin and Pure Joy with your very own plush puppy – “Joy”. MSRP $14.00

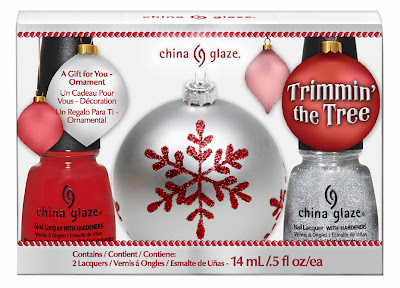
Trimmin’ The Tree: With Love and Glistening Snow with a festive snowflake-embellished ornament. MSRP $14.00

 Cheers!: Angel Wings and Glistening Snow with a frosted shot glass. MSRP $14.00

Jingle All The Way: Pizzazz and Merry Berry with an adjustable Jingle Bell ring. MSRP $14.00

Makin’ Memories: Red Satin and Winter Holly with a “JOY” picture frame. MSRP $14.00

Stocking Stuffers: Pure Joy and Champagne Kisses with a mini stocking. MSRP $14.00

The China Glaze® Holiday Joy collection will be available in November 2012 at fine salons and beauty supply stores nationwide.  The collection will be available in 24- and 36-piece counter displays, a 36-piece rack and 36-piece prepack.

China Glaze is free of DBP, toluene, and added formaldehyde.

China Glaze nail lacquers are available through salons and professional beauty supply stores nationwide. For more information, please visit www.chinaglaze.com or follow China Glaze on Facebook (@ChinaGlaze), Twitter (@ChinaGlazeOfficial) and Pinterest (pinterest.com/chinaglaze).

China Glaze® is a division of American International Industries.

About American International Industries
For 42 years, AII has been the leading manufacturer and worldwide distributor of innovative, quality beauty and skin care products for men and women.  Our product lines include Andrea, Ardell, Body Drench, Bye Bye Blemish, Checi, China Glaze, Clean + Easy, Clubman/Pinaud, Duo, European Secrets, EzFlow, Fright Night, Gena, GiGi, Gypsy Lash, IBD, It’s So Easy, Jeris-Lustray, LASH BeLONG, Nail Tek, No Tweeze/Micro Tweeze, 'N Rage, Poshe, Prolinc, RAW, Seche, SuperNail, Surgi-Care, Waterworks, Winning Nails, Woltra, Woody’s, and Youthair. For more information, visit our website: www.aiibeauty.com

----------------------------------------------------------------------------------------------------------

These look so great! I think my favourites from this are, Glitter All the Way, Winter Holly, Angel Wings and Blue Bells Rings. I can't wait to see these in person! Plus the gift sets look awesome. The perfect gift for a polish lover! Or just the whole collection, wink wink nudge nudge family and friends ;) 

Which ones are you lusting after? Have a great day!

Halloween Splatter

Hey Guys!

Sorry for my absence over the past few days, Halloweek kind of became a bust on here. Last week I had some strange health things happen that kind of put me completely out of commission for a few days. I'm still not entirely sure what's up, but I am starting to feel a little better. So nails might be in short supply over the next while until I get back into a routine.

I did these nails right before I started not feelin so hot, some Halloween Splatter nails!

halloween splatter nails


I started with a base of Milani White on The Spot and then splattered using a regular drinking straw with black creme, China Glaze I'm With The Lifeguard and China Glaze Orange You Hot? in that order.

halloween splatter nails


I really like splatter nails and haven't done any in a long time! I enjoyed wearing these and really enjoyed how the neons splattered on the thinner side so that you could still see the black underneath. Totally cool.

halloween splatter nails


What are your thoughts on splatter manis? Like this halloween inspired colour combination? I hope you're having a great Tuesday! I don't think I'll have another Halloween mani to share with you, so what are you planning on wearing for the Spooky day?

Friday, 26 October 2012

Cute Skull Water Decals

Morning! Continuing on in my Halloweek of Halloween themed nails, I've got some cute Skull Water decals to share with you that you could rock all year round.

I first saw these water decals on ChitChat Nails and thought they were quite possibly the cutest things I had ever seen. So when KKCenterHK gave me another opportunity to review some or their products, I jumped at adding these decals to my list!

I literally put these on the day that I received them in the mail and got waaaaay to excited and started cutting them all up before I had a chance to take a picture of the packaging, so here is what the sheet looks like courtesy of KKCenterHK!

N.NAIL-WDSY558


You can't tell me these aren't insanely adorable! Since there are 5 different skulls I wanted to use a different on on each nail to show them all off. I had also recently gotten an awesome package from Hannah of Polly Polish, which included the amazing GOSH Holographic Hero and knew that I would be showcasing that in these nails.

skull water decals


Gah! I seriously can't get over how adorable these are! I am smitten with them.

skull water decals
skull water decals


Before I started polishing I cut up the sheet so that 10 of the decals (2 of each design) were on their on little square. I wanted to make sure I didn't mess up my base coats while using the scissors. Then I laid them out in the order of the nails that I wanted to use them on. I also grabbed a shot glass and filled it up with water and my tweezers were close at hand.

skull water decals


I used Holographic Hero on my thumb, middle and ring nails. On my index I used Essence Ultimate Pink and on my ring nail I used NYC Lexington Yellow. Then I was looking at my nails and the decals and it seemed like there was going to be a lot of holo so I grabbed some striping tape and striped off my pinky and then added one coat of Essie Bikini So Teeny. Then I started placing the decals in the water for about 10-15 seconds with the tweezers, then pulling them out and pushing the decal off the paper backing and onto my nail. You've got about a 20 second window to move the decal around until you're happy with it and then it will start to adhere to the nail. These worked perfectly! Absolutely no complaints. Except on my pinky, I slid it off and I hadn't waited long enough for the polish to dry so that's why it got stuck in an off kilter position. So make sure your base colour is completely dry before you start dipping your decals into the water. I also thought my thumb was looking a little bare so I added the bones with a black creme and a striping brush and dotting tool.

skull water decals


I'm still wearing these beauties as I type this up and will only be removing them tonight because I have been wearing them for 4 days and I'm getting a few chips.

The best part about these decals? They are only $2.82! You can get 2 10 fingered manicures plus one extra hand for under 3 dollars? Complete win. You can pick up your very own set here! Also since I know you all like some extra savings you can use my 10% off code sincerelystephanienails

These may not be perfectly Halloweeny but they sure are awesome and I will be busting these out again as accent nails for sure in the near future.

What do you think of these cute skull decals? Will you be trying these anytime soon?

Thanks for coming by! :D

Water Decals provided for my honest review.

Thursday, 25 October 2012

Candy Corn Jelly Gradient Sandwich

Hey Guys! Today I've got a bit of a Halloween nail fail. I did these nails after I got home from a curling game the other night. Started at about 10pm and once I realized it wasn't going to work out I didn't have time to go back and fix it! Since I want to show you that everyone has nail art fails, here is mine!

jelly gradient sandwich


I've been itching to do more jelly sandwiches and specifically more jelly gradient sandwiches lately and I thought, hey! Candy corn has three colours! That will be peeerrrrr-fect. So I started out with Wet n Wild Black Creme and then added a coat of my trusty Sally Hansen Glass Slipper (I'm gonna need another bottle of this bad boy soon). From there I started my jelly gradient.

jelly gradient sandwich


I didn't have all the appropriate coloured jellies, so I decided to make my own for the yellow and orange. Essie Marshmallow the best white jelly ever took white jelly position. I mixed some clear polish in a palette with NYC Lexington Yellow and OPI Roll in the Hauge then proceeded to make my gradient using the technique outlined in this tutorial.

jelly gradient sandwich


If you're still reading now you are probably thinking, hmm Candy Corn does not go in that order... and you're right! In my post-curling tired state I completely forgot the order of colours on Candy Corn, which is actually, white, orange and then yellow. I also had recently come across NYC Demon Glow and then thought I could save these nails by making it awesome and glow in the dark. Only to realize that the topcoat glows under black light and not in the dark. Bummer.

jelly gradient sandwich


This manicure has taught me that when I get home from curling I should just go to bed and attempt nail art the next day.

What do you think of my candy corn attempt on another jelly gradient sandwich? Hope your having a greaaat day!

Wednesday, 24 October 2012

The Witchiest Nails of Them All + Tutorial!

Morning Ladies and Gents! Today starts Halloweek here on Sincerely Stephanie! For the next week I will endeavor to post nothing but awesome Halloween themed nails and hopefully throw in a tutorial or two along the way. In the Tell Me Something entry of my giveaway you guys have been requesting a lot more tutorials, so I am going to try and make that happen! If you ever see something that I haven't done a tutorial for, but want me to do one, PLEASE send me an email or comment about it! Sometimes I'm just not sure what you all want to see and then don't end up doing one.

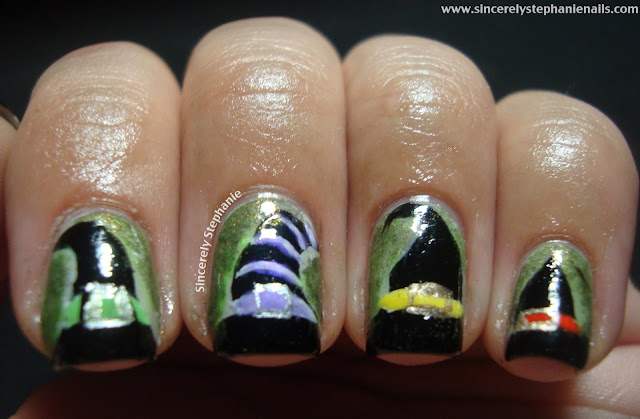
Onto today's nails! I had the idea for these at work one day when I was thinking about Halloween themed things. My mind jumped right to witches and their awesome hats! I like a good witches hat as much as the next girl so I thought I would top my nails off in a few hats.


These nails were easy enough to do, and I tried to film a tutorial, but my camera would NOT cooperate  So I settled for a picture tutorial and I'll give some text to accompany the steps.


Step 1: Start off by painting your base colour. I went with OPI Skull and Glossbones, but really any light colour will do.

Step 2: Take a black striper, I used It's So Easy Stripe Rite Black and draw some outlines of witches hats. I found it easiest to draw a french tip first and then create a shaky triangle going up my nail. Don't worry about any imperfections! You'll fill this in later, and witches hats come in all shapes and sizes :)

Step 3: Take a black creme and using a nail art brush, fill in the outlines that your created in Step 2. You'll have these strange looking black blobs on your nails that will become witch hats.

Step 4: Use a white creme and a striping brush to create stripes right above the brim of the hat, or where the end of a french tip would be. You can create a band like I have on my index and ring nails, or you can add stripes all the way up like I did on my middle nail to give the hat a little something extra. I created the lines in white first so that the colours would really pop when I added them next.

Step 5: Add some colour to your bands! You can use absolutely any colours you want here. I went with, yellows, orange, green and purples to keep the colours feeling halloweenish, but the possibilities are endless. Just go over where you added the white band with a nail art brush and your colour. It does not need to be perfect, your colour probably won't show up too much over the black base if you draw outside the lines.

Step 6: Add a buckle to the band! Use any metallic polish, silver, gold, copper, or any colour you want your band to be and your striping brush to add 4 small lines to create a buckle. I found it best to add the lines on the top and bottom of the band first, because you can just follow the line you have already made and then just connect the top and bottom lines.

Step 7: This is an optional step. I felt like my base was lacking a little so I took Wet n Wild Blackmail a sheer black with coppery flecks and sponged it around the hats. I then took Wet n Wild Fergie Glowstick and sponged it over Blackmail to give the whole thing a ghoulish glow (not pictured)

Step 8: Clean up your cuticles from where you were sponging and apply topcoat! You will have the witchiest nails of them all!


I'm pretty sure I haven't seen Witch hat nails done like this before and they were really cute and easy to accomplish! I would totally rock one as an accent nail and use a Halloweeny glitter on the rest of my nails if I were to do this again! For the bands on my hats I used, OPI Roll in the Hauge, OPI Gargantuan Green Grape Matte, Cult Nails Charming and Essence Wanna Be Your Sunshine!.


Well what do you think of my Witchiest Nails of Them All tutorial? Would you attempt these nails? If you do please share them with me on Facebook or Twitter! I would love to see :)

Hope you're having a witchy Wednesday! ;)

Tuesday, 23 October 2012

Julep's Breast Cancer Awareness Infographic

Hey guys! This gem from Julep just popped through my inbox and since it is still Breast Cancer Awareness Month I thought I would share with you!

This is compilation of various statistics and what can YOU do to try and combat/avoid Breast Cancer. Hope you enjoy!


From the beginning, Julep has been powered by girlfriends. To celebrate these unique roots and to continue to pay it forward, we are proud to donate to organizations that empower women. At Julep, our mission is to ignite the spirit of engagement in women everywhere, and our Powered by Girlfriends initiative is an important part of bringing this mission to life.

To honor National Breast Cancer Awareness Month, we at Julep have teamed up with The Edith Sanford Breast Cancer Foundation. This October, not only are we happily contributing a donation to support their incredible foundation as a part of Powered By Girlfriends, but we also collaborated on this amazing infographic!


Let's all stand together to fight this awful disease! <3 

Icy Purple

Hey guys! Today I've got some nails that I did a week or so ago. I wasn't entirely thrilled with the end result and my pictures are not my best work. I had about half an hour before I needed to leave to go curl and figured I could whip up a quick layering manicure with an stamping accent. Wrong! But alas here are my nails!

purple stamping


I used Sephora by OPI Just a Little Dangerous on my nails except my index and ring, which are sporting Milani White On The Spot. I then added a coat of Daring Digits Ice which is an iridescent clear flakie that flashes blue and purple over all my nails except my ring finger. I added the silver square stud at the base of each nail to give it a little more visual interest. I stamped with Bundle Monster 205 and Wet n Wild Black Creme.

purple stamping


Ice plays a lot better over darker colours, as even in real life you couldn't see it over the white base. I would almost describe Daring Digits Ice as being Cult Nails Seductions infant sister. The flakies were similar in my opinion, except Seduction is in a purple base and Ice is completely clear. So maybe not sisters, but cousins...twice removed... lol I'm on a roll today.

purple stamping
purple stamping


I think the idea of these nails were much better in my head than in the final execution. But alas that happens! I almost didn't show these to you, but last night I went to bed without editing any pictures, so I decided to throw this out there are see what you all think!

So what are your thoughts on this!? Fail or did it have some potential?

Hope you're having a wonderful day :)

Products in this post were provided for my honest review. 

LinkWithin

Related Posts Plugin for WordPress, Blogger...