Morning! Quick post today loves. During Ninja Polish's 12 Days of Christmas Giveaway I was lucky enough to be the Day 5 winner! Included in my awesome package was Ninja Polish He Went to Jarred!
He Went to Jarred is a white gold flakie, drooooooooool. SO PRETTY!
I layered the gorgeous white gold over Color Club Metamorphosis from last years Spring Collection. I love gold flakie top coats don't you?
I've gotta get back to my school work! It's a little overwhelming right now, hope you liked these!
What's on your nails today?!
Showing posts with label flakie. Show all posts
Tuesday, 29 January 2013
Wednesday, 28 November 2012
Wal-Mart Wednesday's: Glitz and Glam
This weeks Wal-Mart Wednesday was a lot of fun to create and I really love the outcome. So let's jump in to this weeks nails, which I've titled Glitz and Glam!
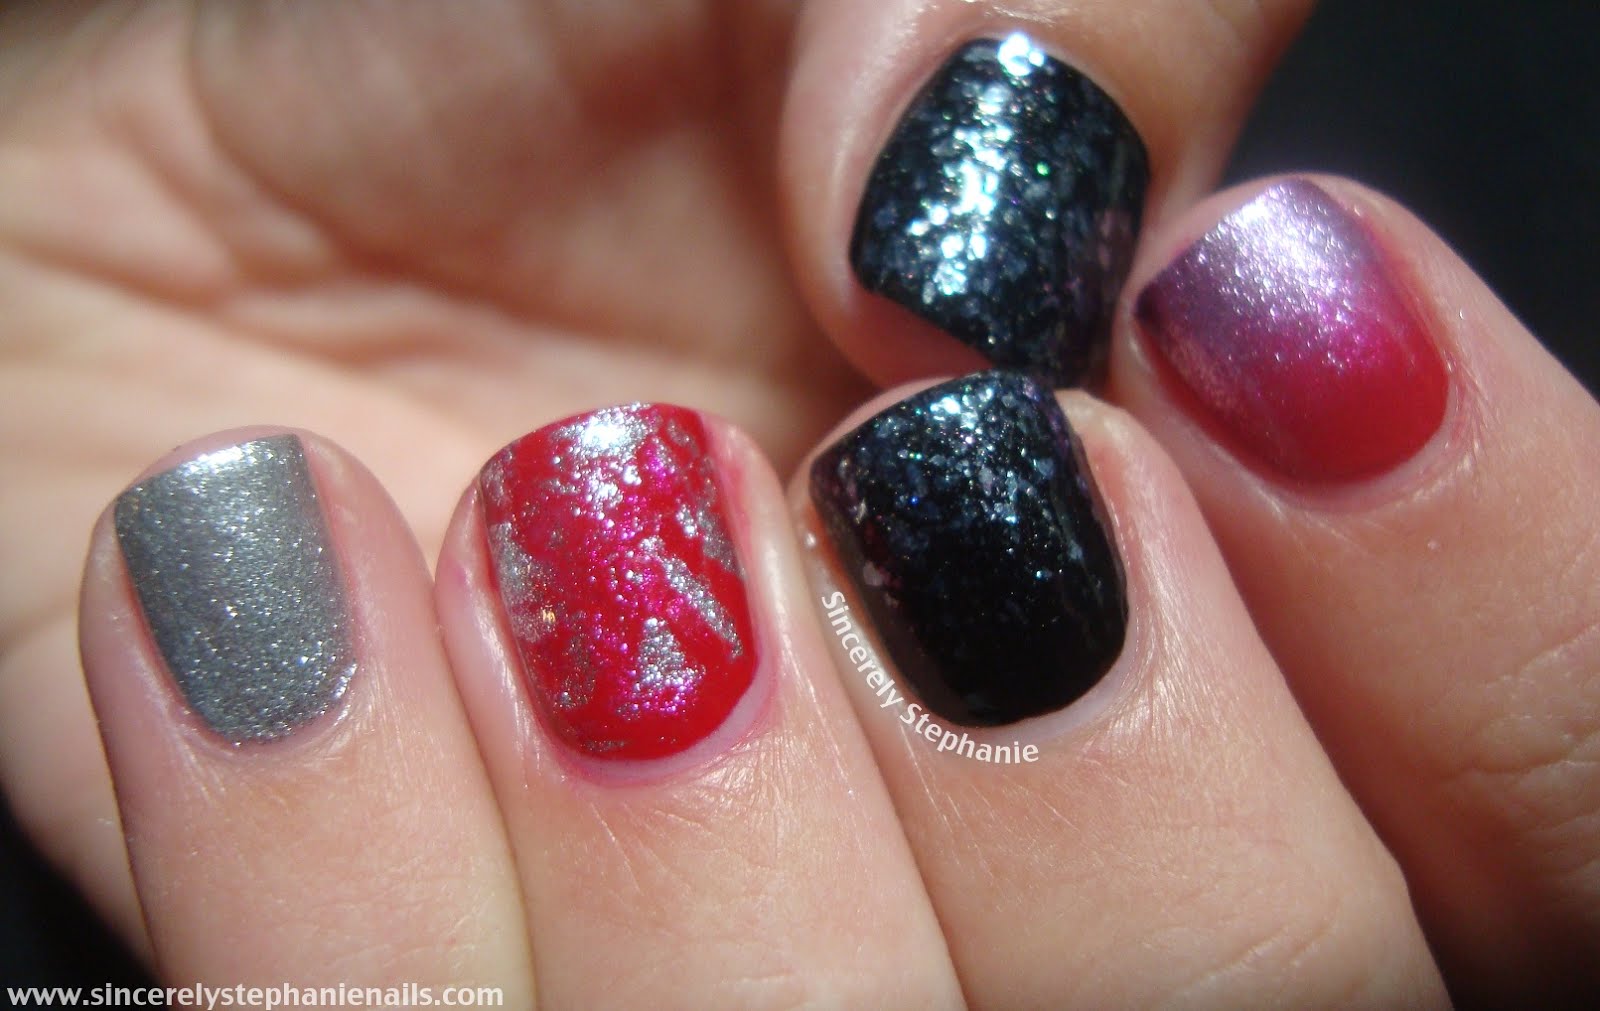
With the Holiday season fast approaching, I wanted to use these next few weeks to showcase some nails that could be used when heading off to a glamorous event. Hey even girls on a dime want their nails to look drop dead gorgeous! For this week I decided to do nails in a classic colour combination. Red, Black and Silver. Any LBD (little black dress) would look perfect with some red lipstick, silver earrings and these nails.
For this look I started off with Sally Hansen Insta-Dri Rapid Red on my index and ring nails. I used Wet n Wild Black Creme on my middle and thumb nails and Sally Hansen Celeb City on my pinky.
Since each nail is different I'll start with my thumb and explain each one from thumb to pinky. After the black base on my thumb I just added two coats of Sally Hansen Glass Slipper. This is one of my all time favourite polishes and I think it gives just a hint of shimmer over the black. Mainly just adding depth.
On my index I did a gradient with Celeb City and Rapid Red using a sponge.
My middle nail was a gradient using Glass Slipper but instead of using a sponge I just used the polish brush and first just painted on the tip, then with each coat painted further and further down the nail leaving a little black near my cuticle.
My ring nail is my favourite. I used the brushstrokes technique where you take essentially all the polish off the brush and then did quick random strokes with Celeb City. I did some more random stroked with Rapid Red and then used a q-tip to make the pattern look a little more random. I quite like the result!
My pinky is 2 coats of Celeb City.
This was a fun and easy look to do! All you need is 4 polishes, a red, a black, a silver and either a glitter or flakie (I think either would work here), a sponge and a q-tip! Again all can be found at Wal-Mart or any other bargain store. Your nails can look fabulous for all your Holiday events even on a dime.
What do you think of my Glitz and Glam Wal-Mart Wednesday? Would you pair these with a LBD for a night out or to a Holiday party?
If you have any events coming up and are in need of a little nail inspiration send me an email with your colour scheme and I would more than happily come up with some ideas for you! :D I really enjoyed creating this look and can't wait to do more!
Hope your Wal-Mart Wednesday is a great one! Stay fabulous :)
With the Holiday season fast approaching, I wanted to use these next few weeks to showcase some nails that could be used when heading off to a glamorous event. Hey even girls on a dime want their nails to look drop dead gorgeous! For this week I decided to do nails in a classic colour combination. Red, Black and Silver. Any LBD (little black dress) would look perfect with some red lipstick, silver earrings and these nails.
For this look I started off with Sally Hansen Insta-Dri Rapid Red on my index and ring nails. I used Wet n Wild Black Creme on my middle and thumb nails and Sally Hansen Celeb City on my pinky.
Since each nail is different I'll start with my thumb and explain each one from thumb to pinky. After the black base on my thumb I just added two coats of Sally Hansen Glass Slipper. This is one of my all time favourite polishes and I think it gives just a hint of shimmer over the black. Mainly just adding depth.
On my index I did a gradient with Celeb City and Rapid Red using a sponge.
My middle nail was a gradient using Glass Slipper but instead of using a sponge I just used the polish brush and first just painted on the tip, then with each coat painted further and further down the nail leaving a little black near my cuticle.
My ring nail is my favourite. I used the brushstrokes technique where you take essentially all the polish off the brush and then did quick random strokes with Celeb City. I did some more random stroked with Rapid Red and then used a q-tip to make the pattern look a little more random. I quite like the result!
My pinky is 2 coats of Celeb City.
This was a fun and easy look to do! All you need is 4 polishes, a red, a black, a silver and either a glitter or flakie (I think either would work here), a sponge and a q-tip! Again all can be found at Wal-Mart or any other bargain store. Your nails can look fabulous for all your Holiday events even on a dime.
What do you think of my Glitz and Glam Wal-Mart Wednesday? Would you pair these with a LBD for a night out or to a Holiday party?
If you have any events coming up and are in need of a little nail inspiration send me an email with your colour scheme and I would more than happily come up with some ideas for you! :D I really enjoyed creating this look and can't wait to do more!
Hope your Wal-Mart Wednesday is a great one! Stay fabulous :)
Thursday, 25 October 2012
Candy Corn Jelly Gradient Sandwich
Hey Guys! Today I've got a bit of a Halloween nail fail. I did these nails after I got home from a curling game the other night. Started at about 10pm and once I realized it wasn't going to work out I didn't have time to go back and fix it! Since I want to show you that everyone has nail art fails, here is mine!
I've been itching to do more jelly sandwiches and specifically more jelly gradient sandwiches lately and I thought, hey! Candy corn has three colours! That will be peeerrrrr-fect. So I started out with Wet n Wild Black Creme and then added a coat of my trusty Sally Hansen Glass Slipper (I'm gonna need another bottle of this bad boy soon). From there I started my jelly gradient.
I didn't have all the appropriate coloured jellies, so I decided to make my own for the yellow and orange. Essie Marshmallow the best white jelly ever took white jelly position. I mixed some clear polish in a palette with NYC Lexington Yellow and OPI Roll in the Hauge then proceeded to make my gradient using the technique outlined in this tutorial.
If you're still reading now you are probably thinking, hmm Candy Corn does not go in that order... and you're right! In my post-curling tired state I completely forgot the order of colours on Candy Corn, which is actually, white, orange and then yellow. I also had recently come across NYC Demon Glow and then thought I could save these nails by making it awesome and glow in the dark. Only to realize that the topcoat glows under black light and not in the dark. Bummer.
This manicure has taught me that when I get home from curling I should just go to bed and attempt nail art the next day.
What do you think of my candy corn attempt on another jelly gradient sandwich? Hope your having a greaaat day!
I've been itching to do more jelly sandwiches and specifically more jelly gradient sandwiches lately and I thought, hey! Candy corn has three colours! That will be peeerrrrr-fect. So I started out with Wet n Wild Black Creme and then added a coat of my trusty Sally Hansen Glass Slipper (I'm gonna need another bottle of this bad boy soon). From there I started my jelly gradient.
I didn't have all the appropriate coloured jellies, so I decided to make my own for the yellow and orange. Essie Marshmallow the best white jelly ever took white jelly position. I mixed some clear polish in a palette with NYC Lexington Yellow and OPI Roll in the Hauge then proceeded to make my gradient using the technique outlined in this tutorial.
If you're still reading now you are probably thinking, hmm Candy Corn does not go in that order... and you're right! In my post-curling tired state I completely forgot the order of colours on Candy Corn, which is actually, white, orange and then yellow. I also had recently come across NYC Demon Glow and then thought I could save these nails by making it awesome and glow in the dark. Only to realize that the topcoat glows under black light and not in the dark. Bummer.
This manicure has taught me that when I get home from curling I should just go to bed and attempt nail art the next day.
What do you think of my candy corn attempt on another jelly gradient sandwich? Hope your having a greaaat day!
Labels:
black,
essie,
flakie,
jelly sandwich,
NYC,
OPI,
orange,
sally hansen,
wet n wild,
white,
yellow
Tuesday, 18 September 2012
KKCenterHK Peacock Water Decals
Good afternoon!
Awhile back I was contacted by the lovely Maggie from the new to me etailer KKCenterHK and have had the pleasure of reviewing some amazing peacock water decals! (N.NAIL Silver Peacock Feathers Pattern Nail Water N.NAIL-WDHHC045-Silver)
This was my first endeavor into using water decals and they are awesome. Hands down. Gorgeous nail art with minimal effort? Perfect when you want to spice up a manicure but don’t have the time. Before you start painting your nails, cut the decals into pieces so that you can easily grab them without worry about smudging your polish.
For this particular look I started off with a coat of my go to black creme, Wet n Wild Black Creme. Then I added a coat of three of the Finger Paints special effect flakies, Twisted, Asylum, and Motley. I probably didn’t need all three coats, but I really wanted there to be an excess amount of flakies. Once that had dried I took the decal that I wanted and with tweezers held it underwater for about 15-25 seconds. I then took the decal and placed it near my nail and slid the design off the paper back and into position! The best part about these is that they don’t dry right away, so you have time once you place it on your nail to move It around until you are happy with where it is.
You do need to be careful when doing your other hand. I happened to do my left hand first, and then when I was doing my right hand, as I pressed the decal onto my nail some of the still tacky polish on my left hand got caught on my other nail and it all came off! So I had to redo one nail. Which isn’t really all that bad!
If you would like to try these water decals you can find them here
! They are US $6.39 for a set AND you can use my awesome 10% off coupon sincerelystephanienails. Water decals are definitely something I will try again in the future. KKCenterHK has so many unique designs to pick from as well, so if peacock feathers aren’t your thing, then maybe one of their other designs is for you.
Have you ever tried water decals? What’s your experience with them? Would you wear these peacock feathers?
Thanks for stopping by! :D
Awhile back I was contacted by the lovely Maggie from the new to me etailer KKCenterHK and have had the pleasure of reviewing some amazing peacock water decals! (N.NAIL Silver Peacock Feathers Pattern Nail Water N.NAIL-WDHHC045-Silver)
This was my first endeavor into using water decals and they are awesome. Hands down. Gorgeous nail art with minimal effort? Perfect when you want to spice up a manicure but don’t have the time. Before you start painting your nails, cut the decals into pieces so that you can easily grab them without worry about smudging your polish.
For this particular look I started off with a coat of my go to black creme, Wet n Wild Black Creme. Then I added a coat of three of the Finger Paints special effect flakies, Twisted, Asylum, and Motley. I probably didn’t need all three coats, but I really wanted there to be an excess amount of flakies. Once that had dried I took the decal that I wanted and with tweezers held it underwater for about 15-25 seconds. I then took the decal and placed it near my nail and slid the design off the paper back and into position! The best part about these is that they don’t dry right away, so you have time once you place it on your nail to move It around until you are happy with where it is.
You do need to be careful when doing your other hand. I happened to do my left hand first, and then when I was doing my right hand, as I pressed the decal onto my nail some of the still tacky polish on my left hand got caught on my other nail and it all came off! So I had to redo one nail. Which isn’t really all that bad!
If you would like to try these water decals you can find them here
! They are US $6.39 for a set AND you can use my awesome 10% off coupon sincerelystephanienails. Water decals are definitely something I will try again in the future. KKCenterHK has so many unique designs to pick from as well, so if peacock feathers aren’t your thing, then maybe one of their other designs is for you.
Have you ever tried water decals? What’s your experience with them? Would you wear these peacock feathers?
Thanks for stopping by! :D
Wednesday, 15 August 2012
Swirly Stamping
Morning dolls!
This will be a quick post today, I'm in the middle of reading an amazing book and seriously all I want to do is finish it! LOL! Awhile ago Anutka of Wacky Laki posted a stunning mani based off an opal. As soon as I saw it I knew I had to recreate it!
I started with 2 easy coats of my favourite OPI My Boyfriend Scales the Walls and then added a coat of Finger Paints Motley a blue green flakie. Then I stamped using BM-201 and Sally Hansen Insta-Dri Blue Streak. I was hoping to capture the flakies more in my pictures, but I did this right when I got home from school and I didn't have my normal photo set up yet. So I tried taking pictures in the sun, which didn't come out until the next day.
My favourite thing about this manicure was that as soon as I finished it my mom looked at it and wanted the exact same thing on her nails!
I loved this swirly subtle stamping look! I wish I had been able to capture the flakies colour shift better here. Just imagine it was awesome ok? ;)
I'm back to my book! Hope you're all having a great day!
This will be a quick post today, I'm in the middle of reading an amazing book and seriously all I want to do is finish it! LOL! Awhile ago Anutka of Wacky Laki posted a stunning mani based off an opal. As soon as I saw it I knew I had to recreate it!
I started with 2 easy coats of my favourite OPI My Boyfriend Scales the Walls and then added a coat of Finger Paints Motley a blue green flakie. Then I stamped using BM-201 and Sally Hansen Insta-Dri Blue Streak. I was hoping to capture the flakies more in my pictures, but I did this right when I got home from school and I didn't have my normal photo set up yet. So I tried taking pictures in the sun, which didn't come out until the next day.
My favourite thing about this manicure was that as soon as I finished it my mom looked at it and wanted the exact same thing on her nails!
I loved this swirly subtle stamping look! I wish I had been able to capture the flakies colour shift better here. Just imagine it was awesome ok? ;)
I'm back to my book! Hope you're all having a great day!
Thursday, 26 July 2012
Jelly Gradient Sandwich Tutorial!
Gooooood Morning loves! Today I am very excited to present my Jelly Gradient Sandwich Tutorial and my YouTube debut!! You have seen the jelly gradient sandwich twice on my blog before, here and here. Each time being a different set of gradients. Well today I decided to create a blue to purple to pink jelly gradient sandwich!
I'm hoping that I will improve with more practice and that my voice overs will eventually get better, so please bear with me while I try to figure out all this YouTube stuff! :)
Meanwhile if you would like you can subscribe to me YouTube Channel! :)
The polishes I used for this manicure are, Nailtini Espresso, Sally Hansen Glass Slipper,China Glaze Ride the Waves, China Glaze Under the Boardwalk and OPI Too Hot Pink to Hold Em. I'm not going to give a verbal explanation because that's what I made the video for! ;)
I hope you all enjoyed my first foray into creating tutorials! If there is anything else you would like to see a tutorial for, so I can practice, because I need it, let me know!
I would love to see if any of you attempt the Jelly Gradient Sandwich so keep up with me on Facebook and Twitter to show me! :D
Thanks SO MUCH for stopping by!!! :D
I got a lot of comments on my past two jelly gradient sandwich posts so I figured it was time to make a tutorial for you all! Now before you watch, I have a lot I can improve upon. I know essentially nothing about videos, but iMovie tutorials helped me and here we have my very first tutorial! All things considered I think it's halfway decent for my first try :)
I'm hoping that I will improve with more practice and that my voice overs will eventually get better, so please bear with me while I try to figure out all this YouTube stuff! :)
Meanwhile if you would like you can subscribe to me YouTube Channel! :)
The polishes I used for this manicure are, Nailtini Espresso, Sally Hansen Glass Slipper,China Glaze Ride the Waves, China Glaze Under the Boardwalk and OPI Too Hot Pink to Hold Em. I'm not going to give a verbal explanation because that's what I made the video for! ;)
I hope you all enjoyed my first foray into creating tutorials! If there is anything else you would like to see a tutorial for, so I can practice, because I need it, let me know!
I would love to see if any of you attempt the Jelly Gradient Sandwich so keep up with me on Facebook and Twitter to show me! :D
Thanks SO MUCH for stopping by!!! :D
Labels:
black,
blue,
china glaze,
flakie,
gradient,
jelly,
jelly sandwich,
nailtini,
OPI,
pink,
purple,
tutorial,
video,
white
Monday, 23 July 2012
Jelly Gradient Sandwich Take Two
Gooood Morning lovelies! It's a Monday, bleeeeh, but today starts my exam period at school. First exam is this afternoon and then in less than two weeks I am done my semester! So I'm going to let you all know that posting might be a little sporadic in these next few weeks. Gotta study for those pesky exams! A few weeks back I posted what I called a Jelly Gradient Sandwich. This was one of my favourite manicures I had done in a while so I decided to redo it using a different colour scheme! At the end of my previous post I talked about doing a gradient in yellow, green and blue. I didn't *think* I owned a yellow or green jelly, but upon further inspection of my stash I found some!
I couldn't decide what pictures to narrow it down to, so I'm just posting all of them! Keep reading after the jump to see how I did this!
Thursday, 12 July 2012
Jelly Gradient Sandwich
Yes you read that title right. Today I have a jelly gradient sandwich to share with you. The other day I was looking at my stats and I suddenly had a higher than normal volume to my Polish Days jelly sandwich post. I investigated a little and it turns out that someone had linked my post on Make Up Alley! So after reading all the awesome things you wonderful people had to say about my jelly sandwich I noticed one person with the nickname supko had suggested a jelly gradient! So I decided to put it in action! Thanks for the awesome idea!
Isn't is preeetttyyyy :D To get this look I started with one coat of Wet n Wild Ebony Hates Chris your basic black creme. Then added a layer of Sally Hansen Glass Slipper. Now here's where it get's interesting. To achieve this jelly gradient I first used OPI Too Hot Pink To Hold Em and swiped across the center of my nail. Then I used OPI Big Hair...Big Nails to do a swipe of jelly goodness near my cuticle and finally used OPI Do You Think I'm Tex-y? to do a swipe of jelly at the tip of my nail. Doing the middle swipe first made sure that the gradient was even and the colours blended.
This is one of my favourite looks that I have done in awhile. Gradient? YUP. Jelly Sandwich. YUP. I'm head over heels in love? YUP!
Wouldn't this look cool in a yellow to green to blue jelly gradient?! I think that might be going on my to try list. Juuuust need to get those jellies. ;) I think I am a tad obsessed with this look. It really is stunning!
What are your thoughts on my jelly gradient sandwich? Is this a look that you would rock? I'd love to see it if you try something like this!
Hope you're having a great Thursday, it's almost Friday! Woo!! Thanks for stopping by ladies and gents!
Isn't is preeetttyyyy :D To get this look I started with one coat of Wet n Wild Ebony Hates Chris your basic black creme. Then added a layer of Sally Hansen Glass Slipper. Now here's where it get's interesting. To achieve this jelly gradient I first used OPI Too Hot Pink To Hold Em and swiped across the center of my nail. Then I used OPI Big Hair...Big Nails to do a swipe of jelly goodness near my cuticle and finally used OPI Do You Think I'm Tex-y? to do a swipe of jelly at the tip of my nail. Doing the middle swipe first made sure that the gradient was even and the colours blended.
This is one of my favourite looks that I have done in awhile. Gradient? YUP. Jelly Sandwich. YUP. I'm head over heels in love? YUP!
Wouldn't this look cool in a yellow to green to blue jelly gradient?! I think that might be going on my to try list. Juuuust need to get those jellies. ;) I think I am a tad obsessed with this look. It really is stunning!
What are your thoughts on my jelly gradient sandwich? Is this a look that you would rock? I'd love to see it if you try something like this!
Hope you're having a great Thursday, it's almost Friday! Woo!! Thanks for stopping by ladies and gents!
Tuesday, 3 July 2012
Let's Make a Jelly Sandwich
It's the second installment of Polish Days! This time we will all be posting delicious jelly sandwiches! My jelly sandwich is inspired by the lovely Sarah at Chalkboard Nails. Awhile back she posted an awesome jelly sandwich using Sally Hansen's Glass Slipper, a white flakie, and then layered Revlons Royal over that. I did something similar, but with purple!
I started off with a base of Wet n Wild Black Creme and then added a generous coat of Sally Hansens Glass Slipper. This is a gorgeous white flakie in a clear base. Once this had dried I added one coat of OPI's Houston We Have a Purple from the Texas Collection, a deep magenta purple jelly.
I really like this kind of jelly sandwich! The flakies are awesome and it looks like it is almost purple flakies instead of a jelly sandwich. The combination with purple and black gives it a bit of a vampy edge that I'm really feeling!
What do you think of this jelly sandwich? If you don't already know it jellies hold a special place in my heart. They are just super squishy goodness and well I just love em. :)
What do you think about jelly sandwiches? Are you a fan? Do you like this one or prefer when they have glitter instead of flakies?
Make sure you stop by the rest of the ladies participating in #SandwichPD!!
I started off with a base of Wet n Wild Black Creme and then added a generous coat of Sally Hansens Glass Slipper. This is a gorgeous white flakie in a clear base. Once this had dried I added one coat of OPI's Houston We Have a Purple from the Texas Collection, a deep magenta purple jelly.
I really like this kind of jelly sandwich! The flakies are awesome and it looks like it is almost purple flakies instead of a jelly sandwich. The combination with purple and black gives it a bit of a vampy edge that I'm really feeling!
What do you think of this jelly sandwich? If you don't already know it jellies hold a special place in my heart. They are just super squishy goodness and well I just love em. :)
What do you think about jelly sandwiches? Are you a fan? Do you like this one or prefer when they have glitter instead of flakies?
Make sure you stop by the rest of the ladies participating in #SandwichPD!!
Saturday, 16 June 2012
Baseball Nails Round 2
I've got some nails that I did on a friend to show you this afternoon! My good friend Alyssa is headed to Toronto for the double header baseball games that are going on this afternoon. So naturally I did her nails for the occasion. :)
I used Orly's Royal Navy and China Glaze Platinum Pieces (crackle) for the majority of her nails. For the accents on her ring finger and thumb I used Sally Hansen White On then added a coat of Sally Hansen Glass Slipper and then used my Red Stripe Rite Striper to freehand the baseball stitching on.
A really cute and simple manicure to wear to the game! I hope Alyssa is having fun today and loves her nails! :D
I hope all of you are having a great Saturday! Up to anything interesting? I'm finishing off an essay, super exciting I know ;)
Thanks for stopping by!! =D
I used Orly's Royal Navy and China Glaze Platinum Pieces (crackle) for the majority of her nails. For the accents on her ring finger and thumb I used Sally Hansen White On then added a coat of Sally Hansen Glass Slipper and then used my Red Stripe Rite Striper to freehand the baseball stitching on.
A really cute and simple manicure to wear to the game! I hope Alyssa is having fun today and loves her nails! :D
I hope all of you are having a great Saturday! Up to anything interesting? I'm finishing off an essay, super exciting I know ;)
Thanks for stopping by!! =D
Orly Fowl Play with Striping Tape
Today I've got what was a maaaaaaaad lemming to show you. I have wanted this polish since I became a polish junkie. Unfortunately I started my obsession after Orly's Birds of a Feather Collection came out and then couldn't find Fowl Play in any store. I was about to resort to paying $10+ on evilBay for the beauty, but I couldn't bring myself to do that. So I looked at other peoples swatches and drooled over how beautiful it was. Then one day I walked into Sally's just to get Orly's Nail Rescue Kit and then it caught my eye. Fowl Play was there! There was just one left so I scooped it up and hyperventilated a little bit and had a gollum moment. As soon as I got home I had to put it on!
Fowl Play is a warm purple jelly base polish that is completely packed to the brim with red to green duochrome flakies, silver microglitter and blue glitter. I think there could be some opalescent glitter in there as well. I'm not sure it's just so PACKED!
Since you all know I can barely leave a polish alone, yes I know, even this one, I grabbed some silver striping tape and added two strips of it down the left third of my nail. I love how reflective the striping tape is. The light was just flying off of it everywhere and it really adds something that polish just can't do.
Are you not dyyyinnnng over this polish? Ok so I'm months late here but I am ecstatic that I finally own it!
Do you own Fowl Play? Are you as madly in love with it as I am? Have you used it in any nail art? I'd love to hear it all!
Thank for stopping by!! :)
Fowl Play is a warm purple jelly base polish that is completely packed to the brim with red to green duochrome flakies, silver microglitter and blue glitter. I think there could be some opalescent glitter in there as well. I'm not sure it's just so PACKED!
Since you all know I can barely leave a polish alone, yes I know, even this one, I grabbed some silver striping tape and added two strips of it down the left third of my nail. I love how reflective the striping tape is. The light was just flying off of it everywhere and it really adds something that polish just can't do.
Are you not dyyyinnnng over this polish? Ok so I'm months late here but I am ecstatic that I finally own it!
Do you own Fowl Play? Are you as madly in love with it as I am? Have you used it in any nail art? I'd love to hear it all!
Thank for stopping by!! :)
Wednesday, 13 June 2012
Abstract Nail Art Challenge Day 7: Half Moons
Morning sweeties! Today is the sixth day in the Abstract Nail Art Challenge and the criteria for today's nails are half moons! I really like doing half moon manis, they are simple, eyecatching and there are endless colour combinations! I'm not really sure where the colour inspiration came for this mani, but something popped into my head and I had to grab these out of my drawers!
I started off with a coat of Sally Hansen White On, making sure that it was opaque near the cuticle but didn't worry about the rest of my nail. Then I grabbed Sally Hansen Glass Slipper, a white flakie and brushed that on near the cuticle. I added a coat of NYC In a Minute Top Coat so that it would dry quickly. Once that was completely dry I took a paper reinforcement cut it in half and placed it at the bottom of my nail. I then took Color Club Sky High and painted over that and then peeled off the sticker before it was dry. Once all my nails were done I added a coat of NYC top coat and then added the two rows of silver bullion balls.
These pictures really don't do these nails justice, I wasn't able to capture the blue to pink duochrome quality in Sky High and Glass Slipper looked really cool as the base! I think the above picture does the best job of capturing how Glass Slipper looked over white.
I loved wearing these. I actually wore them for two days before I started picking all the beads off. I felt like they had a sort of wedding quality to them? Or is that just me?
What do you think of my half moon mani? Do you like the addition of the beads or is that a little too much for you?
Remember to stop by my gorgeous challenge buddies and see what they have done for their half moons!
I started off with a coat of Sally Hansen White On, making sure that it was opaque near the cuticle but didn't worry about the rest of my nail. Then I grabbed Sally Hansen Glass Slipper, a white flakie and brushed that on near the cuticle. I added a coat of NYC In a Minute Top Coat so that it would dry quickly. Once that was completely dry I took a paper reinforcement cut it in half and placed it at the bottom of my nail. I then took Color Club Sky High and painted over that and then peeled off the sticker before it was dry. Once all my nails were done I added a coat of NYC top coat and then added the two rows of silver bullion balls.
These pictures really don't do these nails justice, I wasn't able to capture the blue to pink duochrome quality in Sky High and Glass Slipper looked really cool as the base! I think the above picture does the best job of capturing how Glass Slipper looked over white.
I loved wearing these. I actually wore them for two days before I started picking all the beads off. I felt like they had a sort of wedding quality to them? Or is that just me?
What do you think of my half moon mani? Do you like the addition of the beads or is that a little too much for you?
Remember to stop by my gorgeous challenge buddies and see what they have done for their half moons!
Subscribe to:
Posts (Atom)