Showing posts with label gradient. Show all posts

Tuesday, 19 November 2013

Gradients and Accents Plus Where I've Been

Press Sample Purchased by Me

Hello Polished Friends!

Wow it has been a long time since I sat down and wrote a post on here. I can't believe I haven't talked to you guys in over a month! There have been a number of things going on in my life that have prevented me from blogging recently. I' not going to go into too much detail, but I have been dealing with some personal and familial health issues as well as juggling grad school, and working 4+ days a week in order to pay for everything. It has been a struggle and blogging has been pushed to the back burner. I'm not going to promise that I'm coming back to full strength, but I did want to check in and let you all know I am alive and relatively OK :)


I did these accents and gradient nails a while back now, and I wasn't 100% sure I liked them at the time, and honestly I'm still not convinced lol. It seems like there is something missing... hmmmm. I do love me a gradient though and that is where the inspiration for this manicure began.


For the gradient I started out with Pure Ice Bikini which is such a soft pretty blue. Then proceeded with the gradient using Bikini and Pure Ice Flirt Alert. I did this on every other nail and then added two accents to mix things up a little. On my index nail I started with Color Club Harp On It and then added a coat of Happy Hands Motherboy. On my ring nail I started with my still favourite Cult Nails Tempest and then stamped with PUEEN 20 and black creme.


What do you think about these gradients and accented nails?! I hope I can start posting relatively more regularly soon :) Miss and love you all!

Tuesday, 10 September 2013

31DC2013: Day 10 Gradient

Press Sample Purchased by Me

Goood Morning loves!

Today's theme in the 31 Day Challenge is gradients! I really enjoy gradient nails and don't find myself doing them enough. For today's nails I wanted to try and add something a little extra to the gradient. I was stumbling around the internet and found this image of shadows jumping over a lake at night. I decided to try and recreate this image!


I started off with a white creme base using Cult Nails Tempest just to give a good base for the gradient. Then I painted directly onto a makeup sponge using Sephora by OPI Never Enough Shoes, butter LONDON Giddy Kipper and Pure Ice Bikini on top.


I sponged the polish onto my nails until I had a gradient I was happy with. It's not the most perfectly blended gradient, but I still really like it! Then using Sephora by OPI Never Enough Shoes I freehanded the figures jumping in the air! I tried to make them all a little different in shape and size to give the effect of how it would look if a real group of people were jumping!


These were really fun to do and I'm glad I went a little bit of a different route for the gradient theme! I can't believe we are already a third of the way through this challenge. It is flying by and I'm really proud of some of the manicures that I've come up with already :)

Make sure you are checking out Emily over at The Lacquerologist! She has been coming up with some absolutely killer manicures! Also be sure to enter our giveaway :)

Check out last years gradient nails here!

Sunday, 28 July 2013

Liquid Sand Gradients!

Press Sample

Morning loves!

I have been getting so lost on what day it is lately. Now that I'm done my thesis, I'm hanging out at home with the fam getting things organized for my vacation and my new apartment this fall. So I am totally forgetting what day it is, because I really don't have a schedule anymore! It's quite lovely, actually. Yesterday I sketched out 4 canvases and painted one for my sisters apartment. She asked me to 'practice' for her before I make ones for my apartment! lol! It's fun, but my wrist is sore as I write this up. BUT you're here to see nail polish, so let's jump to it!


When I first got the OPI Bond Girls Liquid Sand Collection I really wanted to try out a gradient. For this look I started out with OPI Honey Ryder the most fabulous multifaceted gold. I just love this polish. Then I sponged on OPI Vesper, a deep purple jelly with black sand pieces.I know I saw this combination somewhere before, but now I have no idea where lol.


This combination was really pretty, but I couldn't stand wearing it for more than about 15 hours lol. The texture on all my nails was a little too much for me I think. I love it as accents, but I think I prefer my nails smooth and maybe one or two accents of texture. Does anyone else feel this way?


Have you worn a textured gradient yet? Are you hopping on the textured bandwagaon? I hope you are all having a wonderful Sunday! I plan on sleeping in and then going out for sushi with my boyfriend! Love you all! <3

Thursday, 25 July 2013

Gradients and Stamping Galore

Purchased by Me

Morning Friends!

Yes this has to be the least creative title ever, but it was all I could come up with at the moment lol. I was browsing through pinterest and found this amazing manicure and knew that I had to recreate it. Thankfully it uses all PUEEN nail plates which I just so happen to have!

PUEEN Stamping


To get this look I started off with a white base, using my current go to Cult Nails Tempest. Then using a make up sponge I got the gradient going using from cuticle to tip, Wet n Wild Lavender Creme, NYC Lexington Yellow and Wet n Wild I Need a Refresh-Mint. Once I was happy with my gradient I added a coat of Seche Vite and allowed that to dry completely.

PUEEN Stamping
PUEEN Stamping
PUEEN Stamping


Once my gradient was dry I got out my stamping tools. I always add top coat before I stamp over a gradient because you work so hard on a gradient you don't want to screw it up!! I needed 4 PUEEN plates to stamp this skittle look. My thumb is PUEEN 05, my index and middle nails are PUEEN 11, my ring nail is PUEEN 08 and finally my pinky is PUEEN 10. All the stamping was done using Wet n Wild Black Creme.

PUEEN Stamping
PUEEN Stamping


I absolutely loved this look! And even though it was a blatent copy of someone elses work I'm still pleased as punch with how it came out :) Do you like this bright gradient and stamped look?

I'm headed out for lunch with my grandparents today to celebrate finishing my thesis and being the first grandchild to finish university! I'm also the eldest so that helps, but I'm going to enjoy our lunch regardless! I hope you are all having a lovely day as well!

Monday, 8 July 2013

The Digit-al Dozen Does Tape: Pink and Glitter!

Press Sample Purchased by Me

Goooooooood Morning loves!

We're back at it this week with another rendition of The Digit-al Dozen! The theme this week is tape. Bleh, I do not like tape manicures. I generally end up getting annoyed with the tape and it sticks everywhere and I get frustrated. SO this week is going to be a challenge. I'm not entirely pleased with todays nails, but its a start!

Striping Tape Nails


I started out with China Glaze Bottoms Up from the new Sunsational Neons Collection on my first 3 nails and Cult Nails Tempest on my ring and pinky nails. On my thumb and index nail I tried to just get some stripes down with striping tape. I put the stripes down and then painted butter LONDON Fairy Cake over the tape then removed it. I forgot one of the cardinal rules of using tape to only do one nail at a time! So my index nail looks all wonky thick.

Striping Tape Nails
Striping Tape Nails


I was sick of tape by the middle nail, so I resorted to a glitter gradient. On my last 2 nails I attempted the watercolour technique with Bottoms Up to give those nails a softer look. Then I added some square silver studs from Born Pretty Store.

Striping Tape Nails


I think I liked these nails more in my mind than in reality, but it's a start to tape week! Hopefully I can pull out something a little better as the week goes on LOL!

What are your thoughts on these pink and glitter nails!? Check out the rest of the Digit-al Dozen below!


Thursday, 6 June 2013

Beachy Blue Gradient

Press Sample Purchased by Me Affiliate Link

Morning!

Todays nail art was actually my fail for my entry to the Beauty and the Beach 2 contest. I like this look, but it inspired something else!

gradient nail art

I started off with the freaking fantastic OPI My Vampire is Buff. I think this is the first time I'm sharing this on my blog, but holy cow it's amazingly fantastic and I want to wear it everyday of my life lol. I did the gradient with My Vampire is Buff and China Glaze Towel Boy Toy. I was going for the beachy feeling of the water washing up onto the shore.

gradient nail art
gradient nail art


Once the gradient was done I felt like it needed slightly more so I sponged on Aphrodite Lacquers Blue Lagoon onto the tip to darken them a little and add the awesome glitter. This is when inspiration struck! I wanted to add a little heart with an arrow to look like sand writing. I used a small brush and a mixture of My Vampire is Buff and China Glaze Desert Sun.

gradient nail art

I love gradients and don't do nearly enough of them. I didn't actually wear this because I took it right off to create my actual Beauty and the Beach look, and wish I had time to really wear it!

Do you like such contrasted gradients?

Saturday, 30 March 2013

Snapping Dragons before Mimosas

Press Sample Purchased by Me

Happy Saturday Everyone!

Make sure you enter the Spring Beauty Essentials Giveaway! ;)

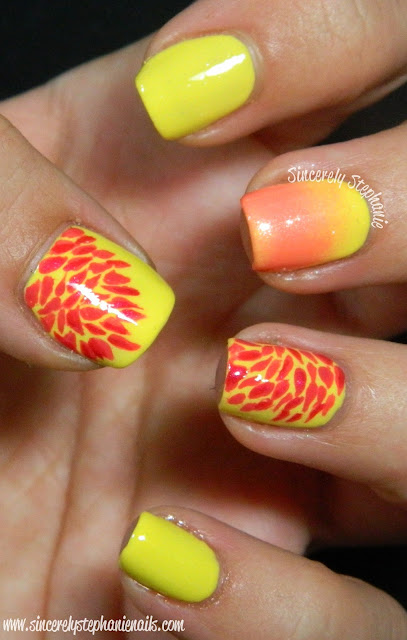
If you are celebrating Easter this weekend I hope that you are having a wonderful chocolate filled weekend. Since it's starting to warm up there is nothing better than yellow and flowers! I love yellow polish during the spring, and florals are classic this time of year.


I started off with NYC Lexington Yellow which is quite possibly my favourite yellow for the price. I have gone through 3/4 of my bottle and will need to pick up a new bottle soon. Then I pulled out the 3 pinky reds from the Avant Garden Blooming Brights Collection and went to work on the rest of the mani.


I used China Glaze Passion for Petals and China Glaze Snap My Dragon to create the flowers on my ring nail and thumb. I used my smallest nail art brush and a quick flicking motion to create all the petals. On my middle nail I used China Glaze Manis Before Mimosas to create the gradient.


These are so fun and bright for spring. Perfect for an Easter weekend! What are on your nails this weekend? I hope you are all having a good one!

Wednesday, 28 November 2012

Wal-Mart Wednesday's: Glitz and Glam

This weeks Wal-Mart Wednesday was a lot of fun to create and I really love the outcome. So let's jump in to this weeks nails, which I've titled Glitz and Glam!

wal-mart wednesday nail art


With the Holiday season fast approaching, I wanted to use these next few weeks to showcase some nails that could be used when heading off to a glamorous event. Hey even girls on a dime want their nails to look drop dead gorgeous! For this week I decided to do nails in a classic colour combination. Red, Black and Silver. Any LBD (little black dress) would look perfect with some red lipstick, silver earrings and these nails.

wal-mart wednesday nail art


For this look I started off with Sally Hansen Insta-Dri Rapid Red on my index and ring nails. I used Wet n Wild Black Creme on my middle and thumb nails and Sally Hansen Celeb City on my pinky.

wal-mart wednesday nail art


Since each nail is different I'll start with my thumb and explain each one from thumb to pinky. After the black base on my thumb I just added two coats of Sally Hansen Glass Slipper. This is one of my all time favourite polishes and I think it gives just a hint of shimmer over the black. Mainly just adding depth.
On my index I did a gradient with Celeb City and Rapid Red using a sponge.
My middle nail was a gradient using Glass Slipper but instead of using a sponge I just used the polish brush and first just painted on the tip, then with each coat painted further and further down the nail leaving a little black near my cuticle.
My ring nail is my favourite. I used the brushstrokes technique where you take essentially all the polish off the brush and then did quick random strokes with Celeb City. I did some more random stroked with Rapid Red and then used a q-tip to make the pattern look a little more random. I quite like the result!
My pinky is 2 coats of Celeb City.

wal-mart wednesday nail art


This was a fun and easy look to do! All you need is 4 polishes, a red, a black, a silver and either a glitter or flakie (I think either would work here), a sponge and a q-tip! Again all can be found at Wal-Mart or any other bargain store. Your nails can look fabulous for all your Holiday events even on a dime.

wal-mart wednesday nail art


What do you think of my Glitz and Glam Wal-Mart Wednesday? Would you pair these with a LBD for a night out or to a Holiday party?

If you have any events coming up and are in need of a little nail inspiration send me an email with your colour scheme and I would more than happily come up with some ideas for you! :D I really enjoyed creating this look and can't wait to do more!

Hope your Wal-Mart Wednesday is a great one! Stay fabulous :)

Wednesday, 21 November 2012

Wal-Mart Wednesdays: Half Moon Gradient

Hello Everyone!

Welcome back to my second installment of Wal-Mart Wednesdays! I have been seeing this style of the half-moon gradient nail art around for awhile and finally decided to try it out. I'm not sure who was the originator of this, so if you know please let me know so I can give proper credit!

wal-mart wednesdays half moon gradient


I started off with Wet n Wild Through The Grapevine and then one nail at a time added a paper reinforcement near my cuticle and did a gradient with Through the Grapevine and Wet n Wild Shield. Remove the reinforcement right after you finish the gradient and you're almost done! A little clean up and add a coat of NYC In a Minute Top Coat while the gradient is still wet to smooth the gradient even more.

wal-mart wednesdays half moon gradient


All the products used in this manicure are from Wal-Mart and nothing costs much more than $2!! Wet n Wild is usually $1.97, paper reinforcements can be found for $2.27 for a few hundred, and cosmetic sponges are $1.97 a bag for 30!

wal-mart wednesdays half moon gradient


Even though all the products used in this post are extremely budget friendly I felt very luxurious wearing these nails. The gold and purple combination and the half moon gradient is awesome together in my opinion. I also got quite a few compliments on these while wearing them.

wal-mart wednesdays half moon gradient


These polishes can still be found at Wal-Mart they are not discontinued, so you can recreate this Wal-Mart Wednesday look! What do you think about the half-moon gradient combination? Would you wear this?

Hope you are having a wonderful Wednesday my loves!

LinkWithin

Related Posts Plugin for WordPress, Blogger...