Morning Ladies and Gents! Today starts Halloweek here on Sincerely Stephanie! For the next week I will endeavor to post nothing but awesome Halloween themed nails and hopefully throw in a tutorial or two along the way. In the Tell Me Something entry of my giveaway you guys have been requesting a lot more tutorials, so I am going to try and make that happen! If you ever see something that I haven't done a tutorial for, but want me to do one, PLEASE send me an email or comment about it! Sometimes I'm just not sure what you all want to see and then don't end up doing one.
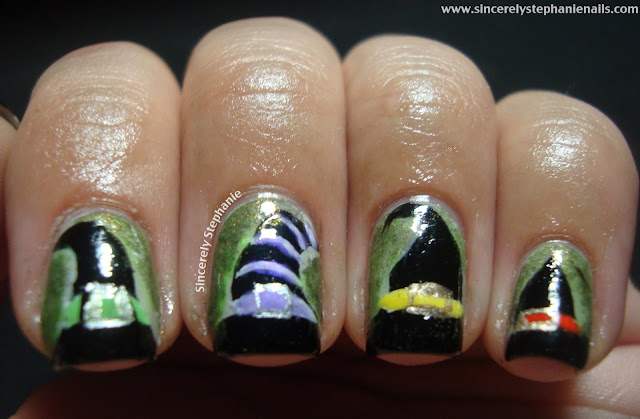
Onto today's nails! I had the idea for these at work one day when I was thinking about Halloween themed things. My mind jumped right to witches and their awesome hats! I like a good witches hat as much as the next girl so I thought I would top my nails off in a few hats.
These nails were easy enough to do, and I tried to film a tutorial, but my camera would NOT cooperate So I settled for a picture tutorial and I'll give some text to accompany the steps.
Step 1: Start off by painting your base colour. I went with OPI Skull and Glossbones, but really any light colour will do.
Step 2: Take a black striper, I used It's So Easy Stripe Rite Black and draw some outlines of witches hats. I found it easiest to draw a french tip first and then create a shaky triangle going up my nail. Don't worry about any imperfections! You'll fill this in later, and witches hats come in all shapes and sizes :)
Step 3: Take a black creme and using a nail art brush, fill in the outlines that your created in Step 2. You'll have these strange looking black blobs on your nails that will become witch hats.
Step 4: Use a white creme and a striping brush to create stripes right above the brim of the hat, or where the end of a french tip would be. You can create a band like I have on my index and ring nails, or you can add stripes all the way up like I did on my middle nail to give the hat a little something extra. I created the lines in white first so that the colours would really pop when I added them next.
Step 5: Add some colour to your bands! You can use absolutely any colours you want here. I went with, yellows, orange, green and purples to keep the colours feeling halloweenish, but the possibilities are endless. Just go over where you added the white band with a nail art brush and your colour. It does not need to be perfect, your colour probably won't show up too much over the black base if you draw outside the lines.
Step 6: Add a buckle to the band! Use any metallic polish, silver, gold, copper, or any colour you want your band to be and your striping brush to add 4 small lines to create a buckle. I found it best to add the lines on the top and bottom of the band first, because you can just follow the line you have already made and then just connect the top and bottom lines.
Step 7: This is an optional step. I felt like my base was lacking a little so I took Wet n Wild Blackmail a sheer black with coppery flecks and sponged it around the hats. I then took Wet n Wild Fergie Glowstick and sponged it over Blackmail to give the whole thing a ghoulish glow (not pictured)
Step 8: Clean up your cuticles from where you were sponging and apply topcoat! You will have the witchiest nails of them all!
I'm pretty sure I haven't seen Witch hat nails done like this before and they were really cute and easy to accomplish! I would totally rock one as an accent nail and use a Halloweeny glitter on the rest of my nails if I were to do this again! For the bands on my hats I used, OPI Roll in the Hauge, OPI Gargantuan Green Grape Matte, Cult Nails Charming and Essence Wanna Be Your Sunshine!.
Well what do you think of my Witchiest Nails of Them All tutorial? Would you attempt these nails? If you do please share them with me on Facebook or Twitter! I would love to see :)
Hope you're having a witchy Wednesday! ;)


These are cute and original, nice tutorial also! Your s to the second power is AWESOME! I am a nerdy math major, so you are reaching out and grabbing my attention with that! Big time. You are smart and arty!
ReplyDeleteaww thanks so much! I'm a huge nerd too so I figured it was very fitting!
Deletetoo cute! ;)
ReplyDeleteThank youuuu!!
DeleteThese are so cute!!
ReplyDelete:D thanks patricia!
DeleteThis is super cute, great tutorial!
ReplyDeleteThanks Amber!
DeleteOh my gosh this is so cute! Thanks for the tutorial as well!
ReplyDeleteThank you Tishana!
DeleteWow! So adorable! I haven't seen anything like this!
ReplyDeletePerfectly seasonal and oh so cute!
ReplyDeletethanks so much girl! xx
Delete